How to Create a Resume Website or Portfolio Website
Sep 7, 2022
Our modern world is constantly changing and advancing how things are done, with sharing professional portfolios and resumes as one of the traditions being revolutionized. From typical expectations of handing in physical resumes in the past, now digital copies and online-accessible resumes and/or portfolios have gained in popularity.
Websites offer dynamic features when used as resumes or portfolios that give them many advantages over other typical forms of presenting your resume and/or portfolio to those that are interested in them. For starters, your website resume/portfolio is always available and can be accessed anywhere at any time by anyone who wants to know more about you. Your website resume/portfolio can also be updated and maintained by you at any time for maximum professionalism and appeal. Additionally, your website can be a dynamic and expressive representation for yourself, doing part of your job for you and giving interested parties a strong pitch for why they should choose or hire you. Overall, creating a website resume/portfolio becomes a smarter and more effective choice every day, which is why in this article, I’ll teach you how to create a website that you can use as your resume and/or portfolio to make a great impression and stand out from your competitors.
First impressions are crucial for websites, where visitors determine if they find a site visually appealing or not within their first 0.2 to 2.6 seconds on a site. Nobody wants to stay and continue viewing an unappealing site, so if you want your visitors to like what they see and stay on your site, you’ll need to make sure your site looks professional, presentable, and visually appealing, regardless of what profession or industry you work in.
Fortunately, many website building services out there offer professional-looking, appealing design as forefront selling points for what they offer their users, so that their users can get off to strong leaping starts when building their website. When looking for an approachable, simple-to-understand website builder that’s suitable for people of all experience levels, I’ve found Website.com’s Site Builder to be the website building service that I enjoy using the most and find to be the most easy to adapt to. It features straightforward drag-and-drop site building that keeps things clear and simple while offering you a great level of customizability, and on top of this, its elements and building process are designed to allow for great professionalism and presentability in your final product. On top of this, they offer over 500 website templates for their users to jumpstart their site design with, all of which are polished and professional-looking to be the best possible foundations for people to create beautiful customizable websites.
2. Gather Your Work and Information
With creating a resume site, you’ll need to populate your site with quality content that represents what you have to offer in terms of your relevant education, experience, skill sets, works, and more. Think of this as collecting the information you need to fill out any regular old resume and/or portfolio, but this time, you’re doing it with the intention of placing it on a website instead. This step most ideally happens before you begin any major steps in building your site, so that you can gather what you want to place onto your site first, rather than using up time and struggling to find them after you’ve already begun building your site.
For example, let’s say you’re a business student in university/college who’ll be graduating this year and is looking to share your works on a website portfolio for prospective employers and other interested parties to see. In preparation of creating and populating your site with your work, you’d gather up evidence and results of things like your course projects, extracurricular projects, any startups you’ve participated in, events or programs you helped organize, and any other relevant pieces of experience you can showcase as part of your portfolio. When you get everything you need together earlier rather than later, it can save you a lot of time down the road when you get to build your site around what you have ready to show, and not when you’ve already begun building your website and are limiting where and what you can use to show off your potential.
Having your different projects neatly sorted out and ready for their contents to be posted on your site is just one way you can streamline your resume website/portfolio website creation process.
3. Create the Essentials for Your Site
When organizing your content on a site you’ve built yourself, you fortunately have the freedom to decide how and what you’d like to set up. It’s important to note, however, that any site that aims to represent its creator and their works needs several core features and pages for it to accomplish its purpose. These core pages help round out your website so that its visitors get a clear and well-rounded picture of who you are and what you have to offer.
A Professional Looking Photo of Yourself
For certain industries or jobs, such as social media content creator or video blog host, this step is vital, since you want people to have a good idea of what you look like as their starting point for understanding who you are. Along with giving visitors an idea of what you look like, any photos on a website are a great way to grab visitors’ attention. This is why you’d want a professional looking (and preferably professionally-taken), presentable photo to begin painting an appealing and professional idea of you in your visitors’ minds. The safest option is unsurprisingly to go for neutral, professional looking headshots that have feelings of both serious professionalism and appealing approachability. Don’t be afraid to hire a professional photographer to help you out with this step; you won’t regret doing so!
It’s important to note that depending on what sort of industry or work you’re looking to fulfill, you may find this step to be very important, or to be unnecessary compared to you including the rest of your previous experience, skills, and projects. Take a look at your own situation and decide if this step is worthy of completing, or should just be skipped.
A Presentable and Appealing Home Page
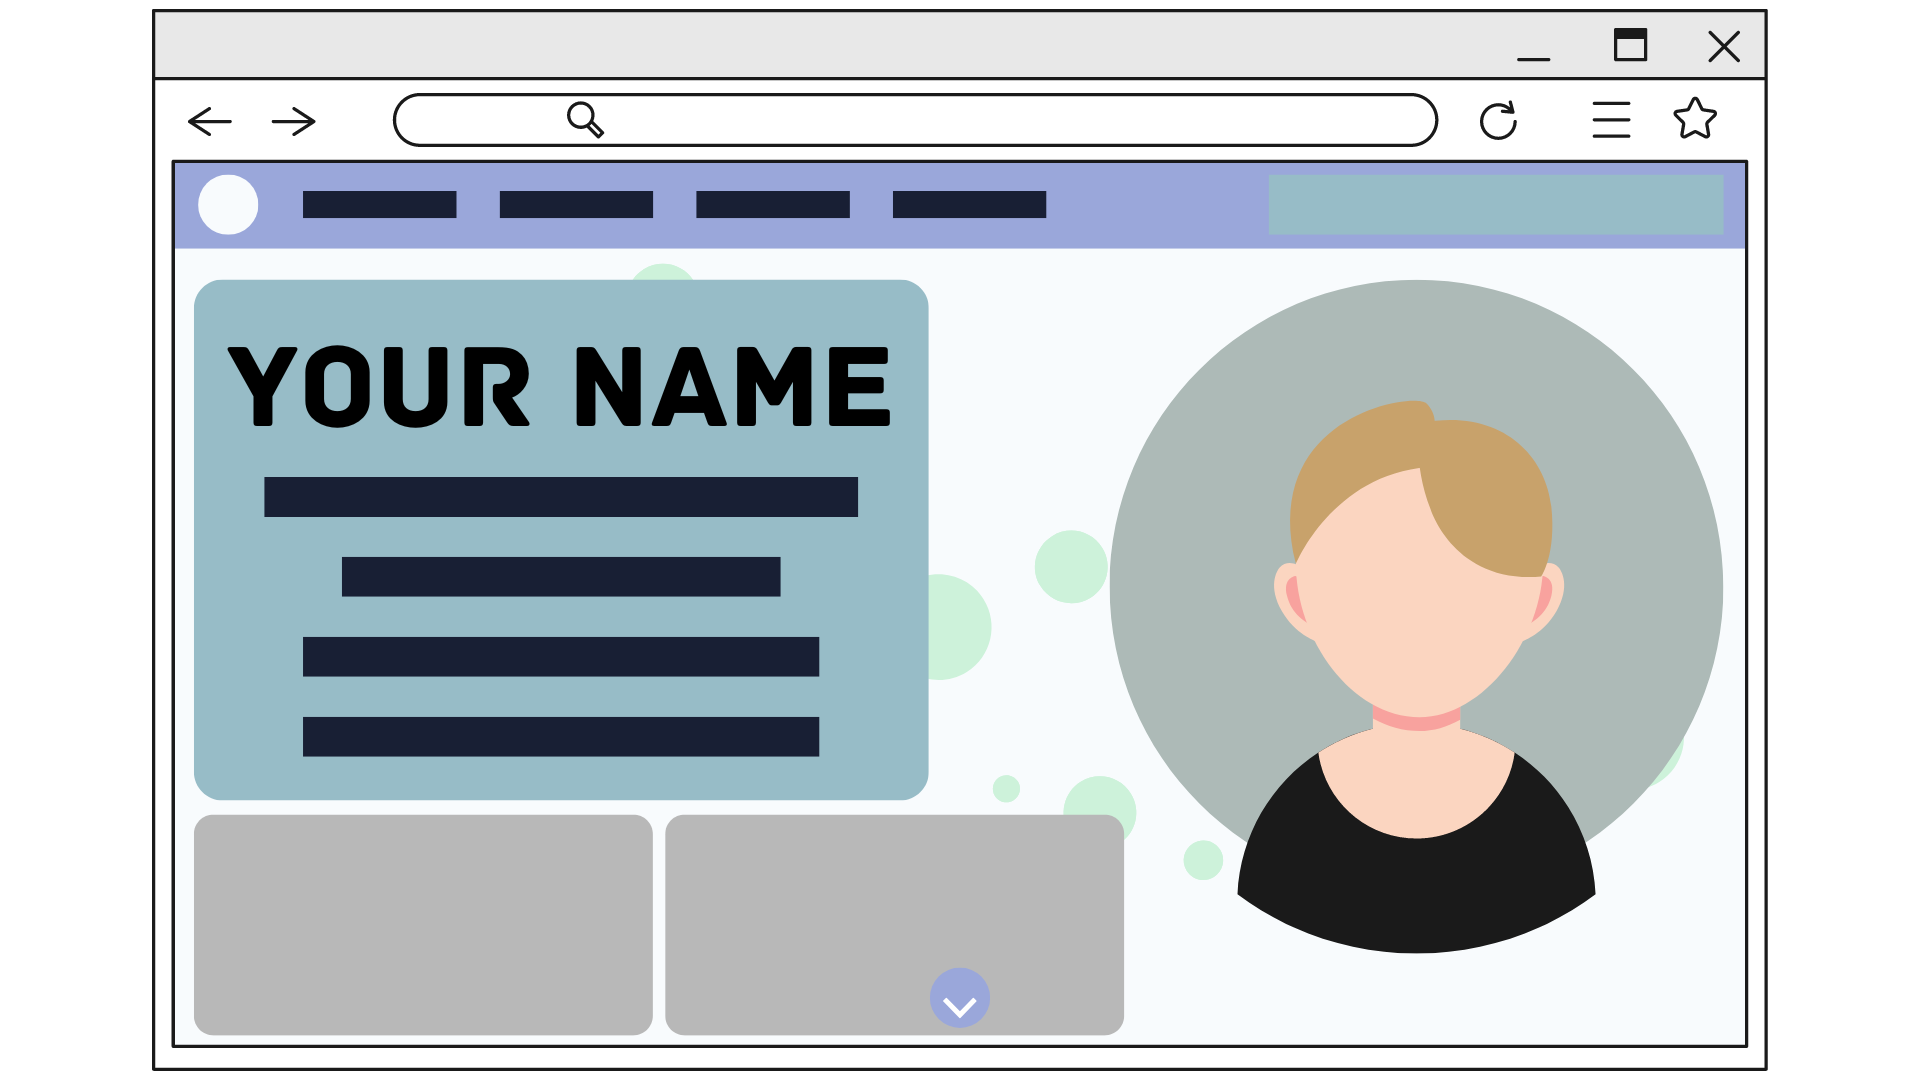
Your site’s home page will very likely be the first thing anyone interested in you and what you have to offer sees. This is where you make a crucial first impression on your site visitors, so make it a great summary of who you are, what you do, and what you can offer. This is where you’d include that professionally-taken photo of yourself from earlier, alongside information like your full name, contact information, field(s) of work, and positions both current and past. You could also include a blurb about your experience and background, but keep it on the brief side so that visitors aren’t overwhelmed by what you have to say. Don’t worry, the rest of the content on your site will progressively tell them more about you!It’s important to note that depending on what sort of industry or work you’re looking to fulfill, you may find this step to be very important, or to be unnecessary compared to you including the rest of your previous experience, skills, and projects. Take a look at your own situation and decide if this step is worthy of completing, or should just be skipped.
Your home page will likely be the first thing that greets your resume site visitors, among them being potential employers, so make sure the home page’s contents are put-together and appealing to make the strongest first impression that you can.
Detail Your Experience
It’s normal for your experience to be the area you spend the most time on when creating a resume. Don’t be discouraged if you find yourself spending a lot of time thinking about what and how to express yourself in this section. For each piece of experience you have, share the job, then list some of your main roles, tasks, and achievements. For this section, it’s recommended that you only include relevant experience to the types of work you’re aiming for. For example, if you’re a business student who’s about to graduate and is looking to work in finance-related positions, but you worked for a year in catering 2 years ago over the summer, it’s probably best if you leave this previous landscaping experience out, since you’re looking for work related to finance, not landscaping.
List Your Education History
Many employers will want to know your education history, so be sure to include it in your website resume. Because your education doesn’t take the spotlight compared to your past experience, however, you don’t need to worry about going too in-depth with this section. As you would do for any standard resume, include each institution you’ve attended with its location and your date/year of graduation. Details like your major/minor, any honors you received, and/or any relevant significant publications and projects you contributed to should be included.
Highlight Your Skills
You should set aside a part of your resume to list your relevant talents and affinities that you think your resume viewers would be interested in seeing. These skills will of course vary between different people depending on what field or industry they want to work in, so think about what skills are desirable in the fields that you’d like to work in, and include them here. For example, if you’re looking to work in finance-related positions, you could list any and all languages you speak, any computer programs or systems you have proficiency in (such as Microsoft Office services like Microsoft Excel and Outlook, or more specific finance management software like Xero), and any other skills or abilities that would help your resume viewers get a better idea of why they’d want to hire you specifically. If you haven’t mentioned some of your particular skills anywhere else on your resume site, this is the section of your resume website to include it.
Personal Project Portfolio
Along with stating who you are and what you can do, you should be able to demonstrate what you can do and have done. Remember the evidence and results of the different projects and tasks you’ve completed that you prepared earlier while following this article? Now’s the time to put that gathered content to use! Show off your creative abilities by listing and sharing with your visitors personal projects, creations, works, and anything else relevant to what you do. Package each project that you display with a detailed description, information about your process, and any other forms of context that you’d want your visitors to know. Personal projects establish you as a dynamic, self-motivated, and capable individual at what you do.
Use your portfolio to showcase your abilities and potential to your site visitors. Impress them with pleasing layouts for your site page section itself, and with the showcase portfolio itself being made of high quality content.
Contact Information
With your resume/portfolio site existing to make strong impressions on those who visit it, you’ll be wanting interested visitors to be able to quickly and easily contact you in the cases when they want to inquire about working with you, or directly hire you for their projects. If your contact information is hard to find or nonexistent on your site, your visitors will be disappointed and you’ll have missed out on potential opportunities. This is why you should consider adding your contact information to easily accessible locations on your site, such as in the footer of your site, or give your contact information a dedicated page with a prominent link to it in the header of your site.
Recommendations and Testimonials
People are inclined to take the word of others greatly into account when they’re making decisions and considerations. Think about how you pick out where to shop, eat, or hire services from: you very likely look at reviews and consider them far more often than you don’t. This is why including people’s testimonials of working with you in the past, or how you completed previous projects for them, can be a great contribution to the overall content of your site. The necessity of this section on your resume website depends on what sort of industry and work you want to work in. If you’ve had previous experience involving copious interaction with clients and/or peers, you could invite them to write about their experiences with you for you to feature on your site. Of course, it’s ultimately up to you to decide if you’d like to do this, but if it fits what you’d like to definitely add this to your resume site!
Link Your Social Media and Online Presence
Depending on the sort of work you do and which online social channels you’ve maintained a presence on, you’ll want to link your professional profiles on different platforms to your site. This lets your resume viewers further gain a well-rounded idea of how you represent yourself and what you bring to the table with the overall work you do and presence you maintain. Those who work in professional fields would benefit the most from linking a maintained LinkedIn account, alongside professional accounts on other platforms, to their resume site. Those who work in more creative fields would benefit from linking accounts on platforms upon which your work is displayed, such as Facebook, Twitter, and Instagram.
4. Make Your Site Presentable
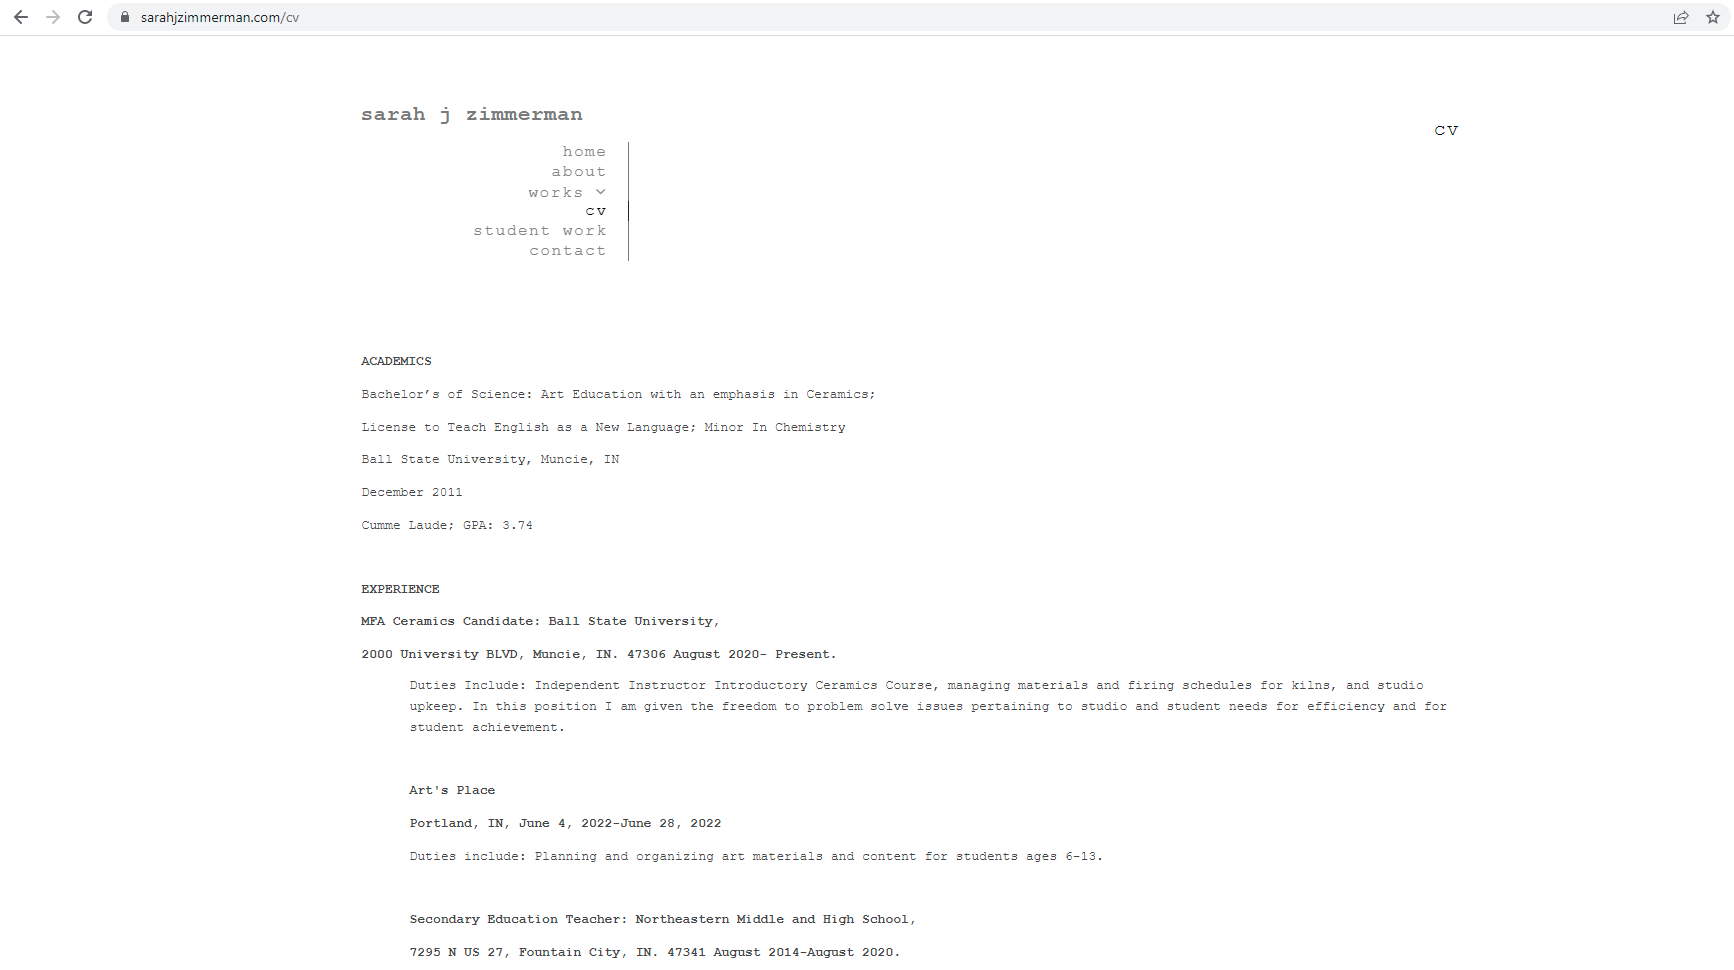
After you’ve sorted out what and how you plan to organize your site’s content, another critical aspect of your resume site comes into play: it’s overall visual appeal and accessibility. A key aspect of a website’s presentability is how pleasant it is to the eye, and how strong its first impressions are. Website visitors make up their minds within their first 0.2 to 2.6 seconds on a site about whether it’s appealing enough to stay on, after all. What goes into making a site appealing is admittedly varied and isn’t extremely simple to grasp at first. Fonts, color schemes, layouts, quality, and more are all aspects you need to consider if you want to create a truly appealing website, but not to worry. Helpful tips about the basics of font selection, going further with font selection, what to consider with domain name selection, and how to select your website’s colors and layouts are all readily available online for you to refer to and use to your advantage when designing your resume site. Don’t be afraid to take a little longer or refer to more resources with the visual design process; it’ll all be worth it when you eventually finish and end up with great presentable results!Your end goal can be a polished and professional-looking site like this one, which has been built using Website.com’s Site Builder. Browse through the site and note the simple and easy-to-navigate site design, clear organization of content, professional manner and good attention to detail used to write and arrange the site’s content, and the well-taken photos featured throughout the site. This site is missing the ability to download a resume in a PDF format, but otherwise, it’s a great example of the sort of resume website you should be striving for!
While some might find this site’s simplicity to be a little boring or not exciting enough, for professional usages like on a resume website, this is an ideal layout and amount of content that feels organized, clean, and easy to digest. It’s better for your site to be well-done but a little on the boring side than for your site to be loud and exciting but also lacking in professionalism.
5. Ensure Your Accessibility
With your resume site, you want your content to be as widely accessible and hassle-free to view as possible. This is why it’s important to ensure 2 things: first, that your site is accessible via mobile, and second, that your resume is downloadable in a PDF format. A site being mobile-friendly matters more and more every day, with 58.99% of website traffic worldwide originating from mobile devices. This is why your site should be optimized for mobile viewing, to make sure that anyone browsing on mobile has as good of an impression of you and your website as someone browsing from their desktop PC. How can you do this? Depending on the way you’ve built your site, you’ll need to go through different processes to make sure your site is optimized for a mobile viewing experience. For example, if you used the Website.com Site Builder, you’d be able to edit the mobile version of your site in the same session you’re editing its desktop version in. I’ve personally found this feature to be really convenient, and it’s saved me a lot of hassle and time when creating desktop and mobile versions of websites in the past. Having your resume be downloadable in a PDF format on your site is vital if you want to maximize you and your website’s possible reach. When your resume is available for download in this format, it fulfills the wants of your resume viewers who might want to save your resume to their files for easy access, or print out your resume to look at or share with others in person. For any reason why potential employers would want a PDF version of your resume available, offering it as an option can help you secure more interest from them. I suggest including a tab or button to it somewhere easily accessible from all locations on your site, such as in the header or footer of your site.
6. Review and Finalize
Once you’ve completed all the previous steps and have fleshed out your resume site with everything you need, you can proceed to review all your content to make sure it’s how you want it to be before you publish your site and begin using it to represent yourself to others. Take a look at your site and make sure it’s organized, high quality, and appealing. Additionally, don’t be afraid to ask for second opinions from those around you, who can tell you what their impressions of your site are and if they see any potential hiccups in your content. You and those you’ve asked for second opinions can test your site’s links and content to make sure it functions properly, check for any errors in your writing or personal projects, and decide whether your site accurately represents you and what you have to offer to employers. Once you’re happy with how things are, you can go ahead and publish your site to start welcoming visitors. Congratulations, you’ve successfully created a resume site!
7. How to Create a Resume Website: A Step By Step Guide
First, log in to Website.com and choose a template you find suitable for your resume. From here, we’ll be building out different sections of the site using the template you’ve selected!Now we need to edit and add the essentials. First, if it’s fitting for your field or industry of work, add a professional-looking photo of yourself. Go ahead and skip this step if it wouldn’t apply to your field of work, or if you don’t feel a need to have a photo of yourself on your resume.
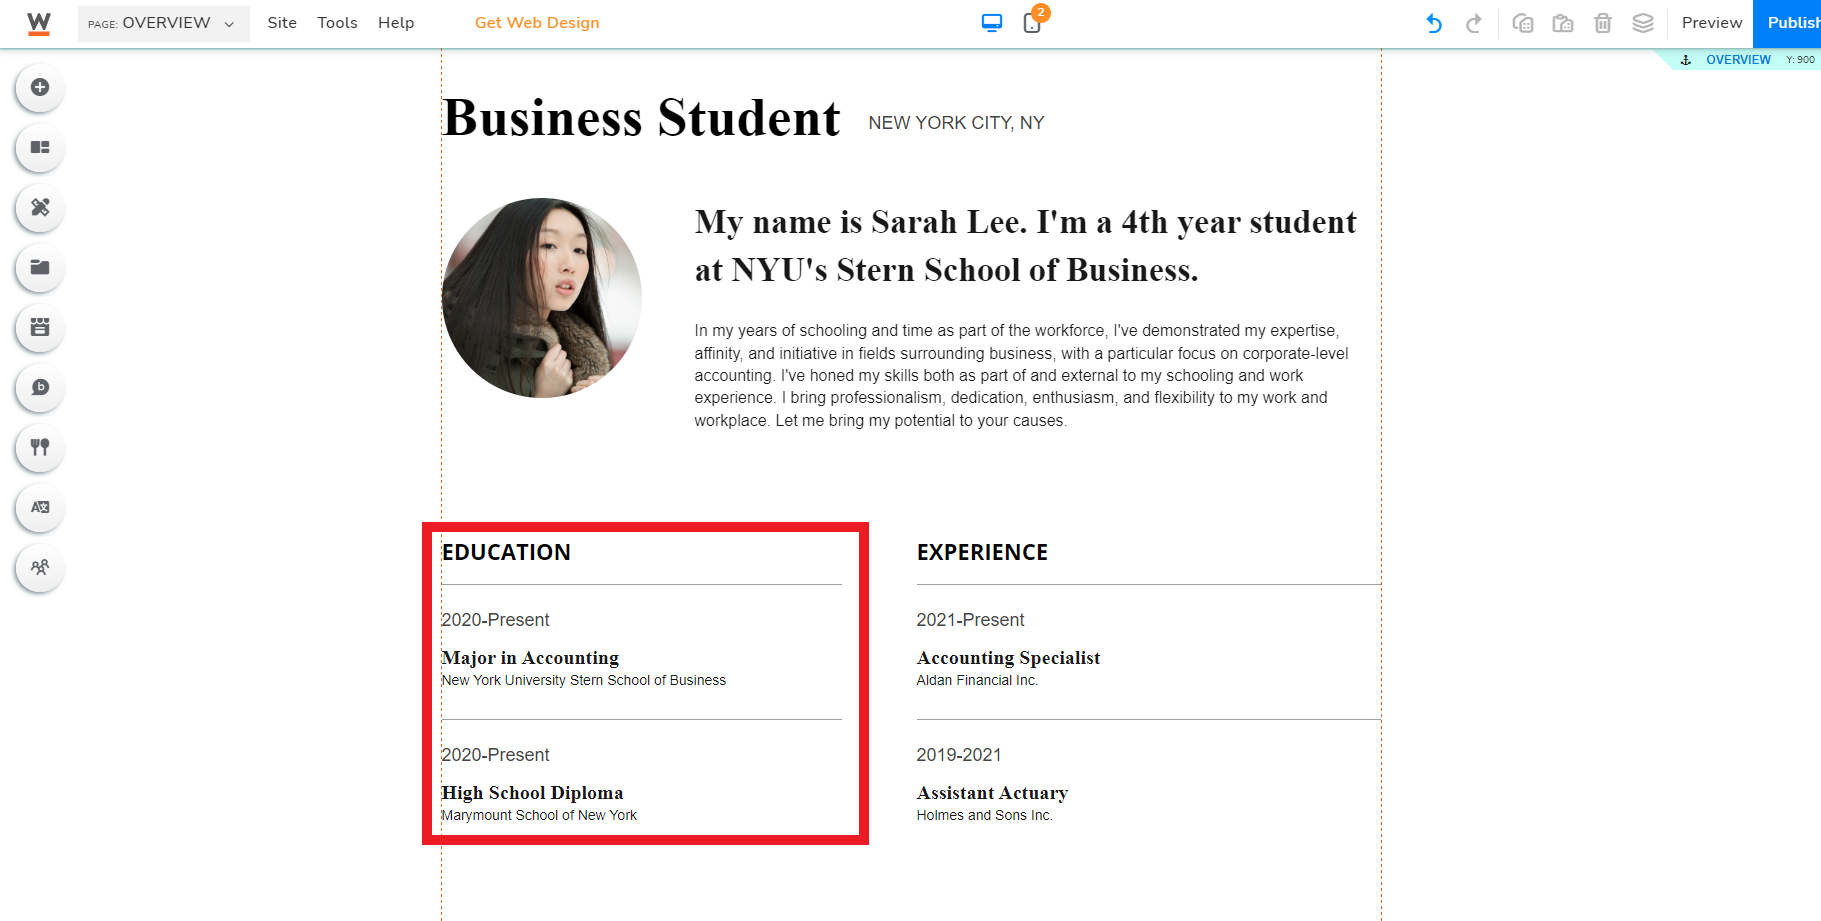
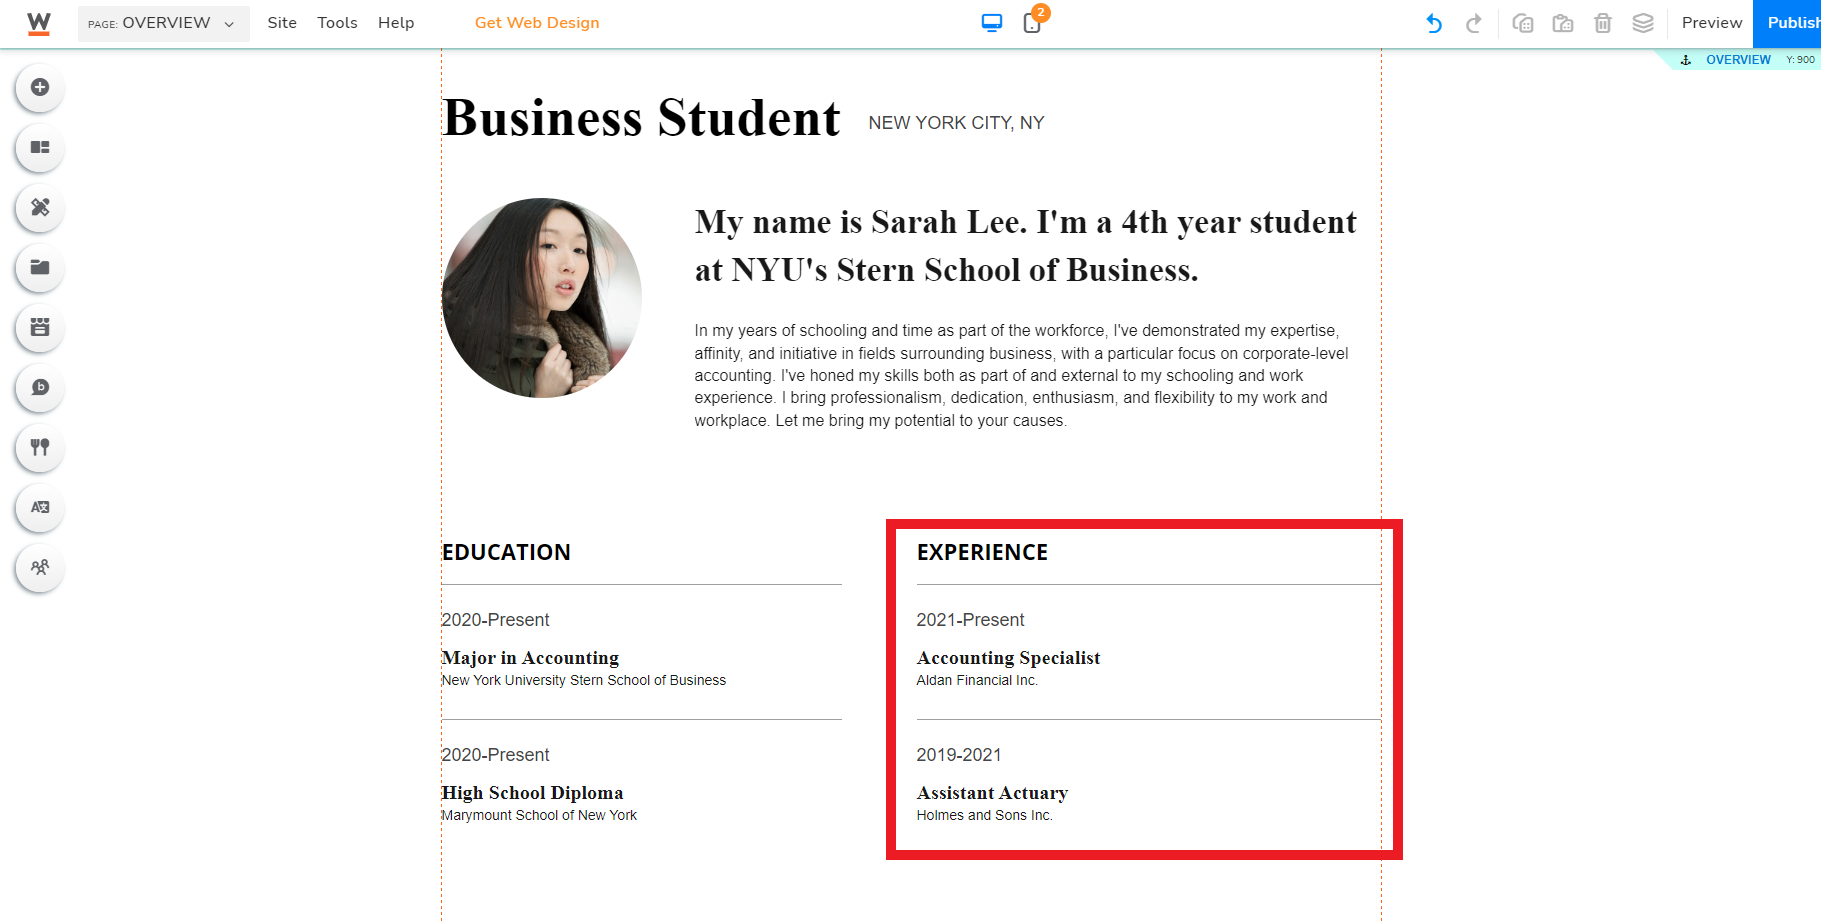
Now we need to fill out a quick overview of our experience and education.
let’s now create an overview of what our overall experience in the field looks like. Additionally, let’s learn how to change pictures within different parts of our site.
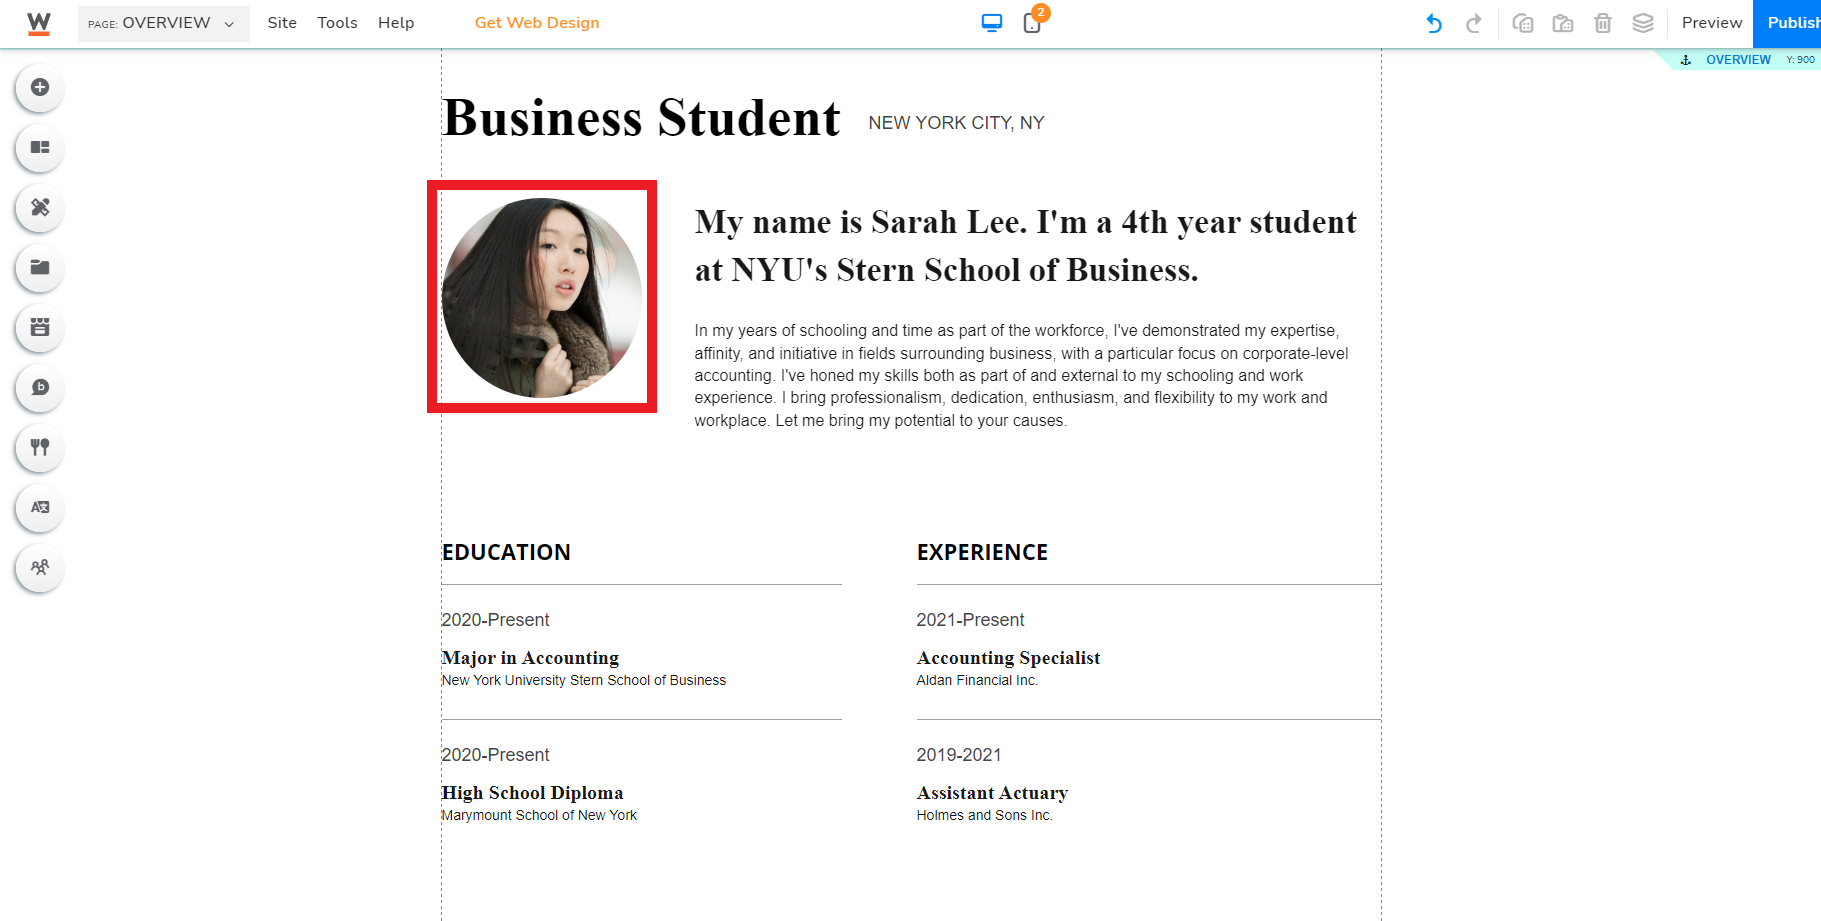
First, I’ve created an overview section that talks about experience, like so:
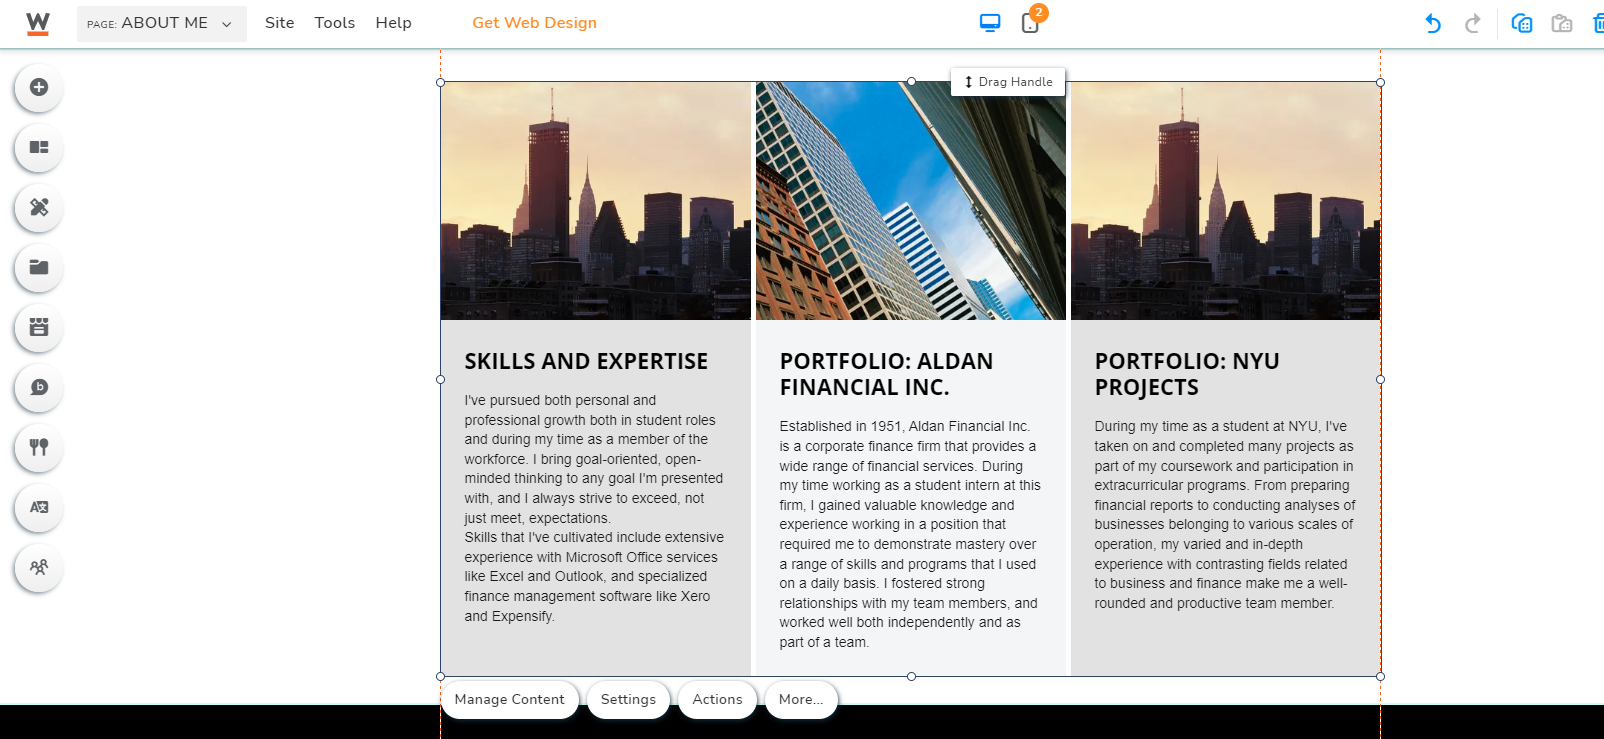
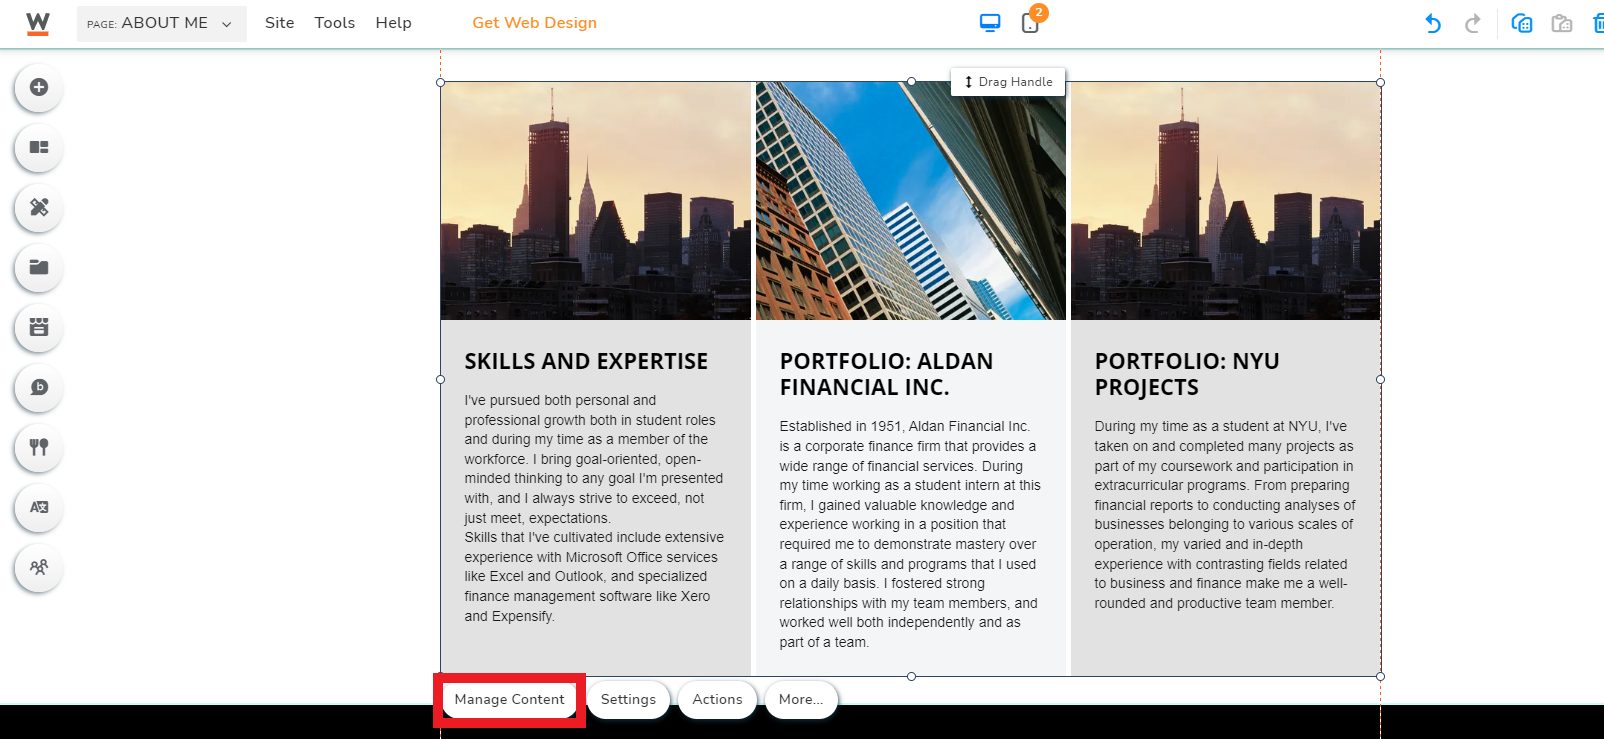
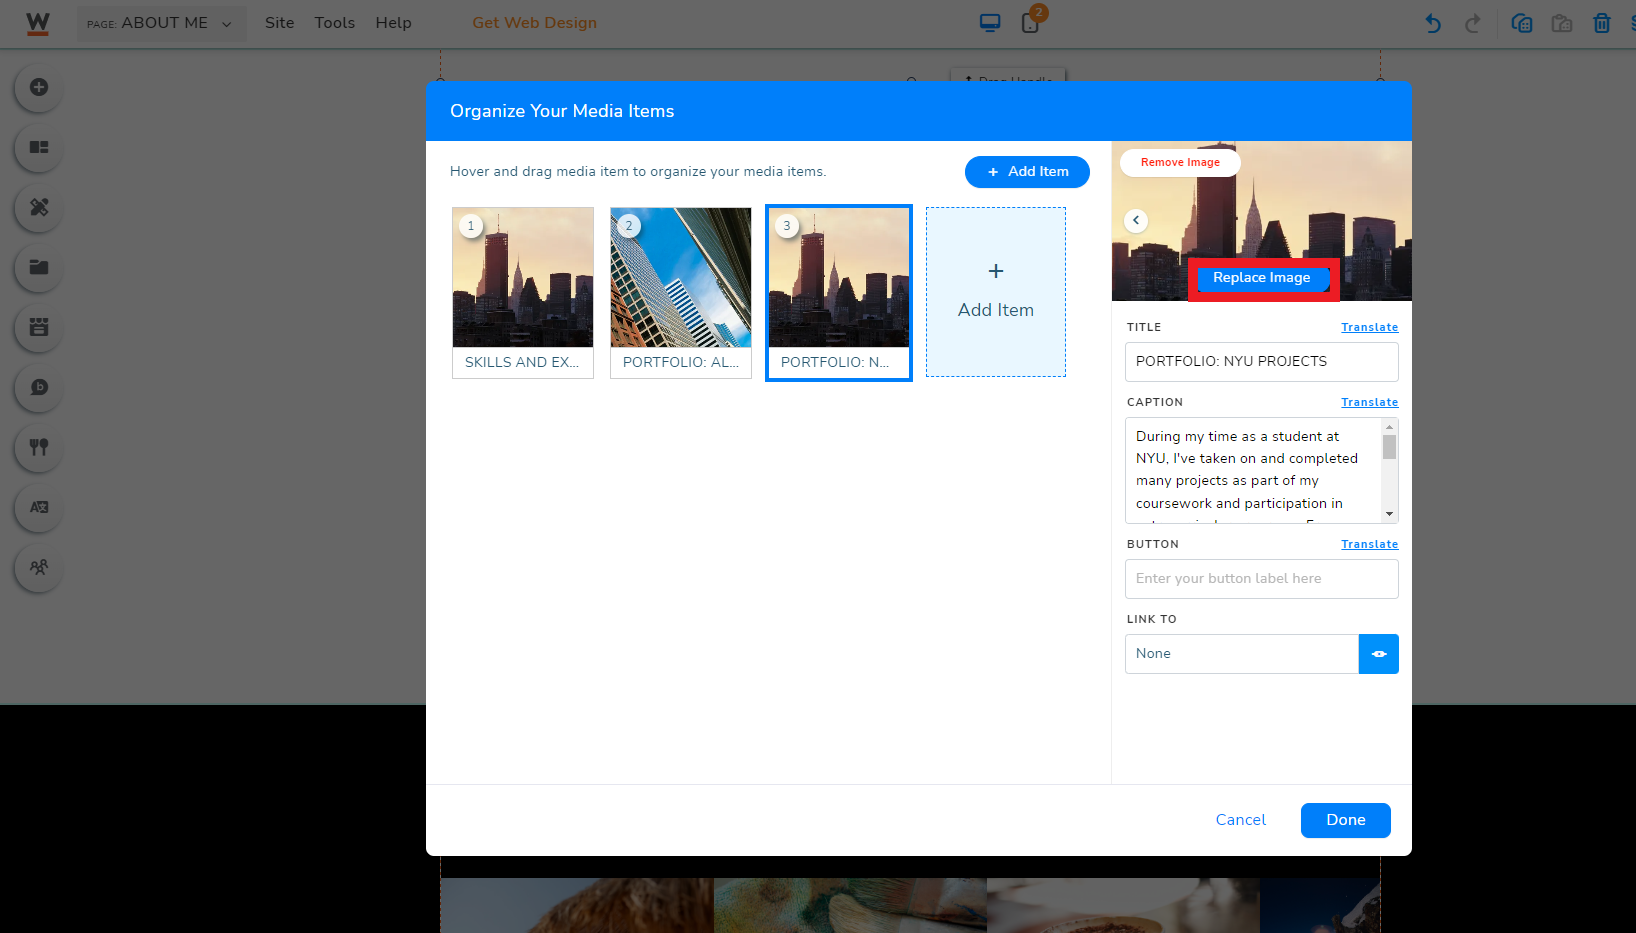
To change the images present in the box, first left click on the content you want to change, then press the “Manage Content” button.
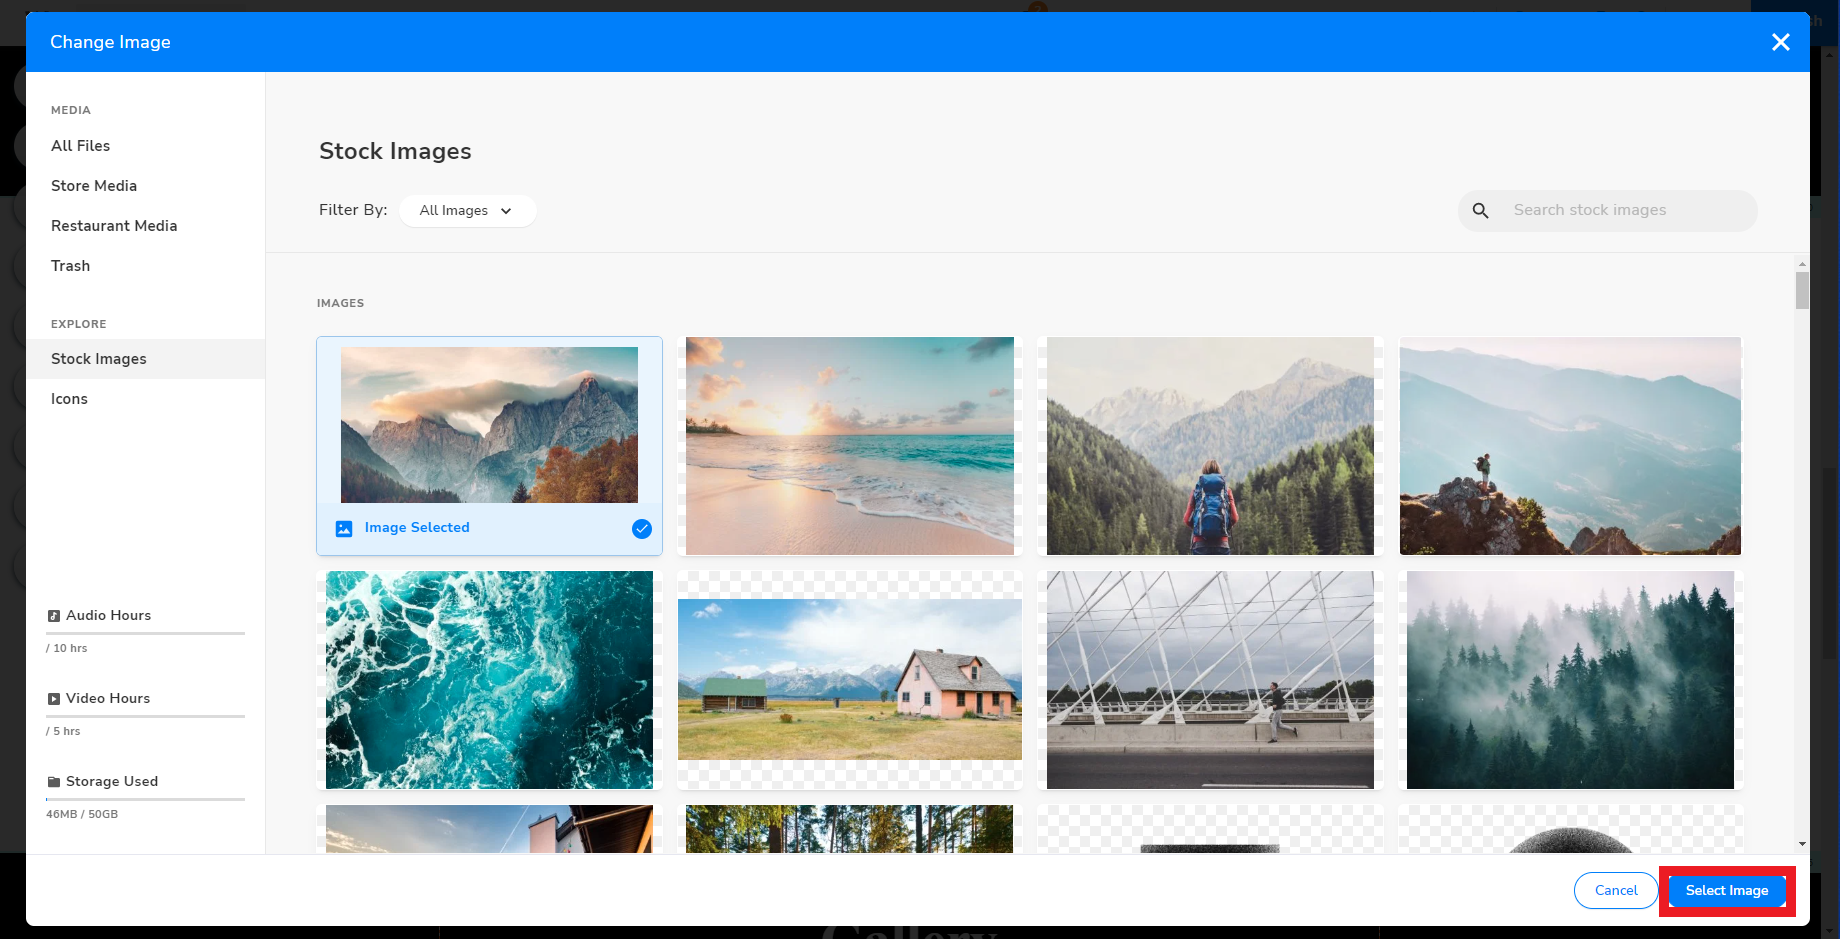
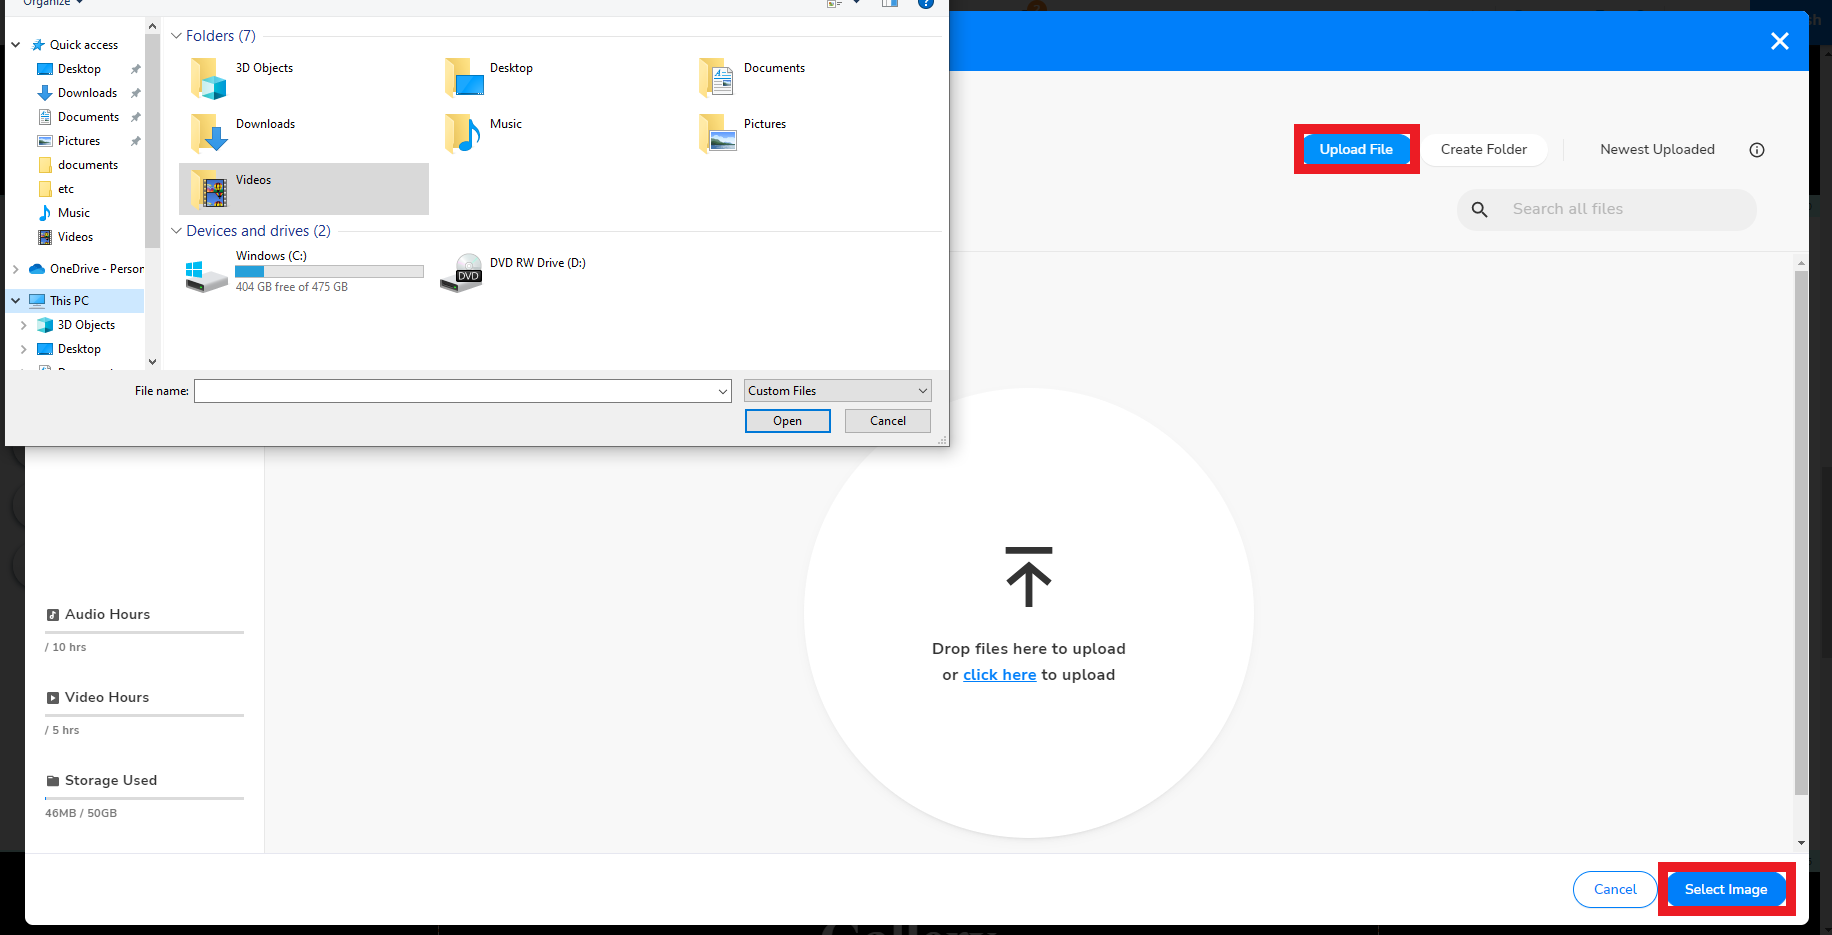
Now a window will pop up. In this window you’ll be able to select your different displayed media items, and in the top right of this window for each of the media items will be a button that says “Replace Image”. Click this button to open up another window in which you can replace the image you’ve selected by uploading your own images to use, or by using one of countless stock images available with the site builder. Once you’re satisfied with your new image selection, press the “Select Image” button in the bottom right corner of this new window, and you’ve successfully changed your image!
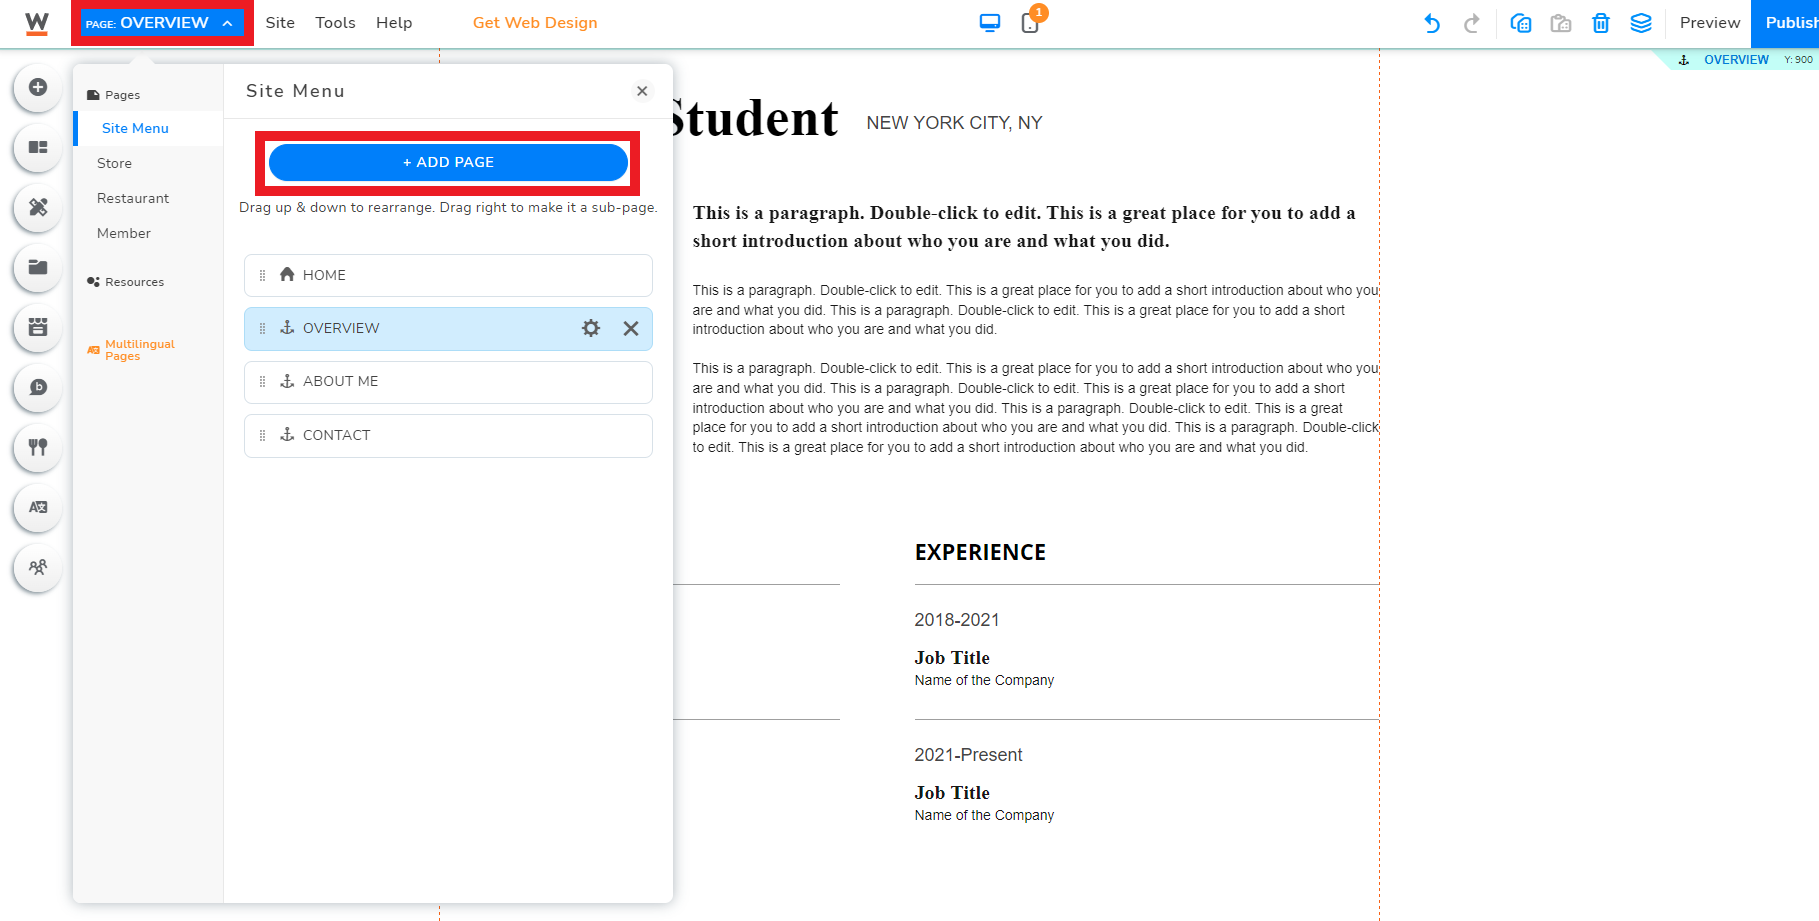
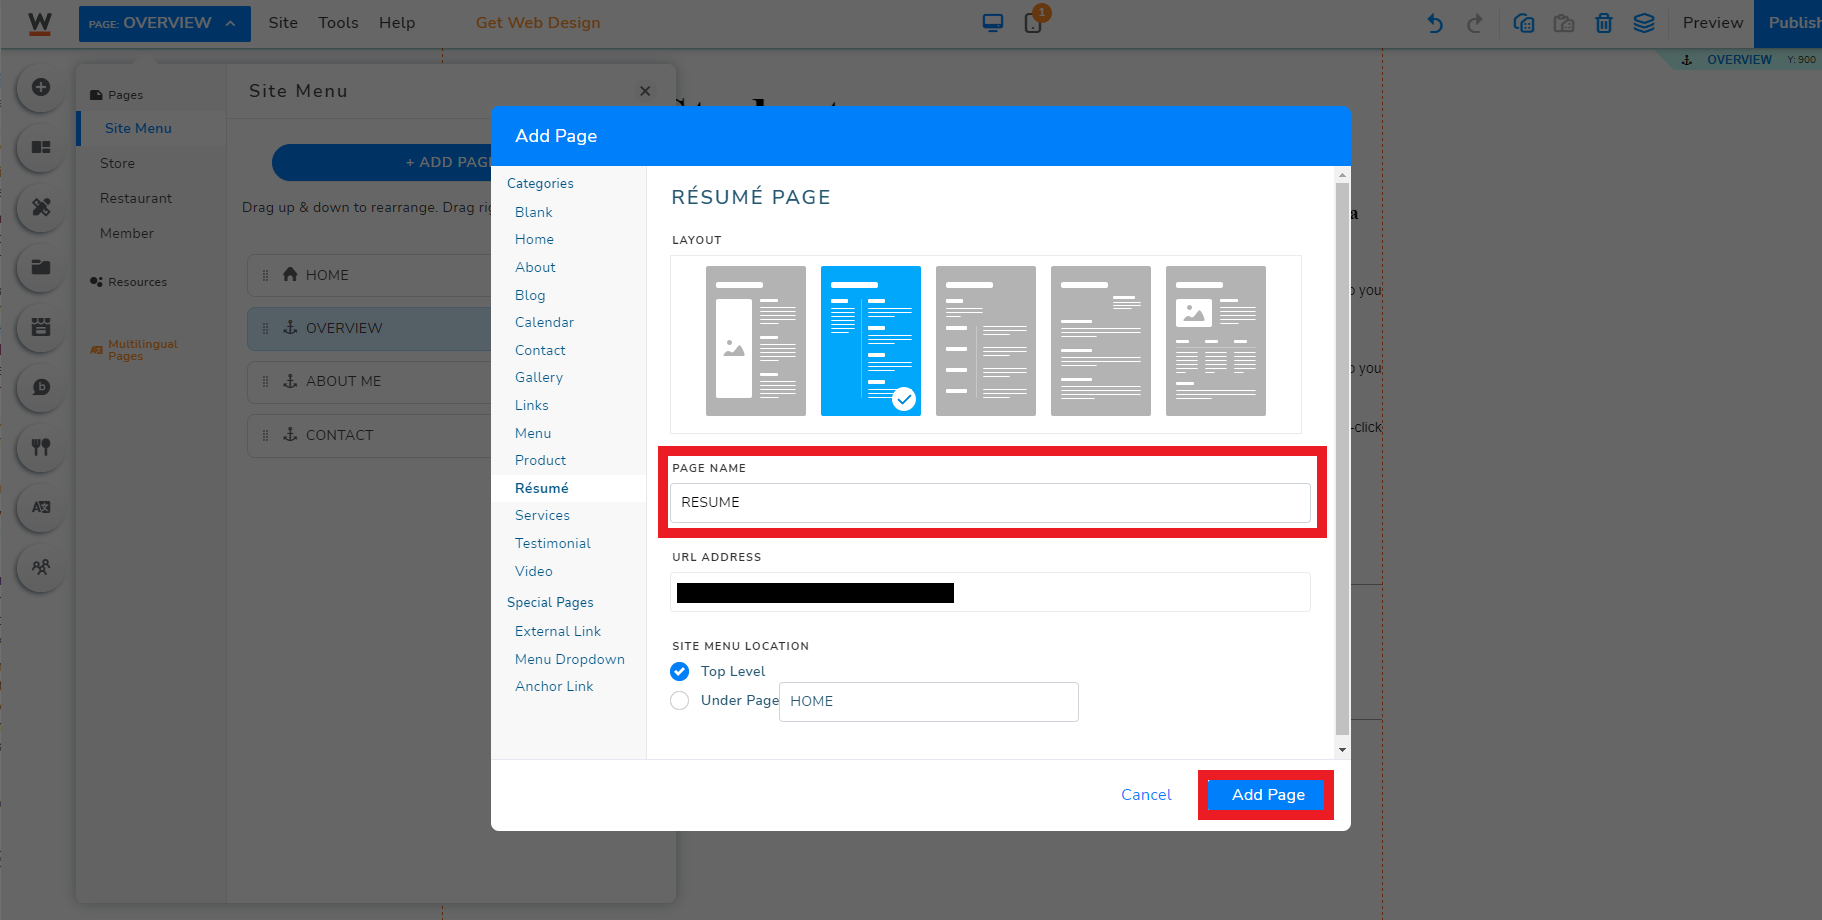
To expand on the experience that we share in our resume, let’s create a page to specifically serve as a resume page. To create a new page, go to the “PAGE:” button in the top left of your editor and click the “+ ADD PAGE” button.
In the interface that pops up, select your desired page layout and fill in the blanks, then hit “Add Page” in the bottom right corner.
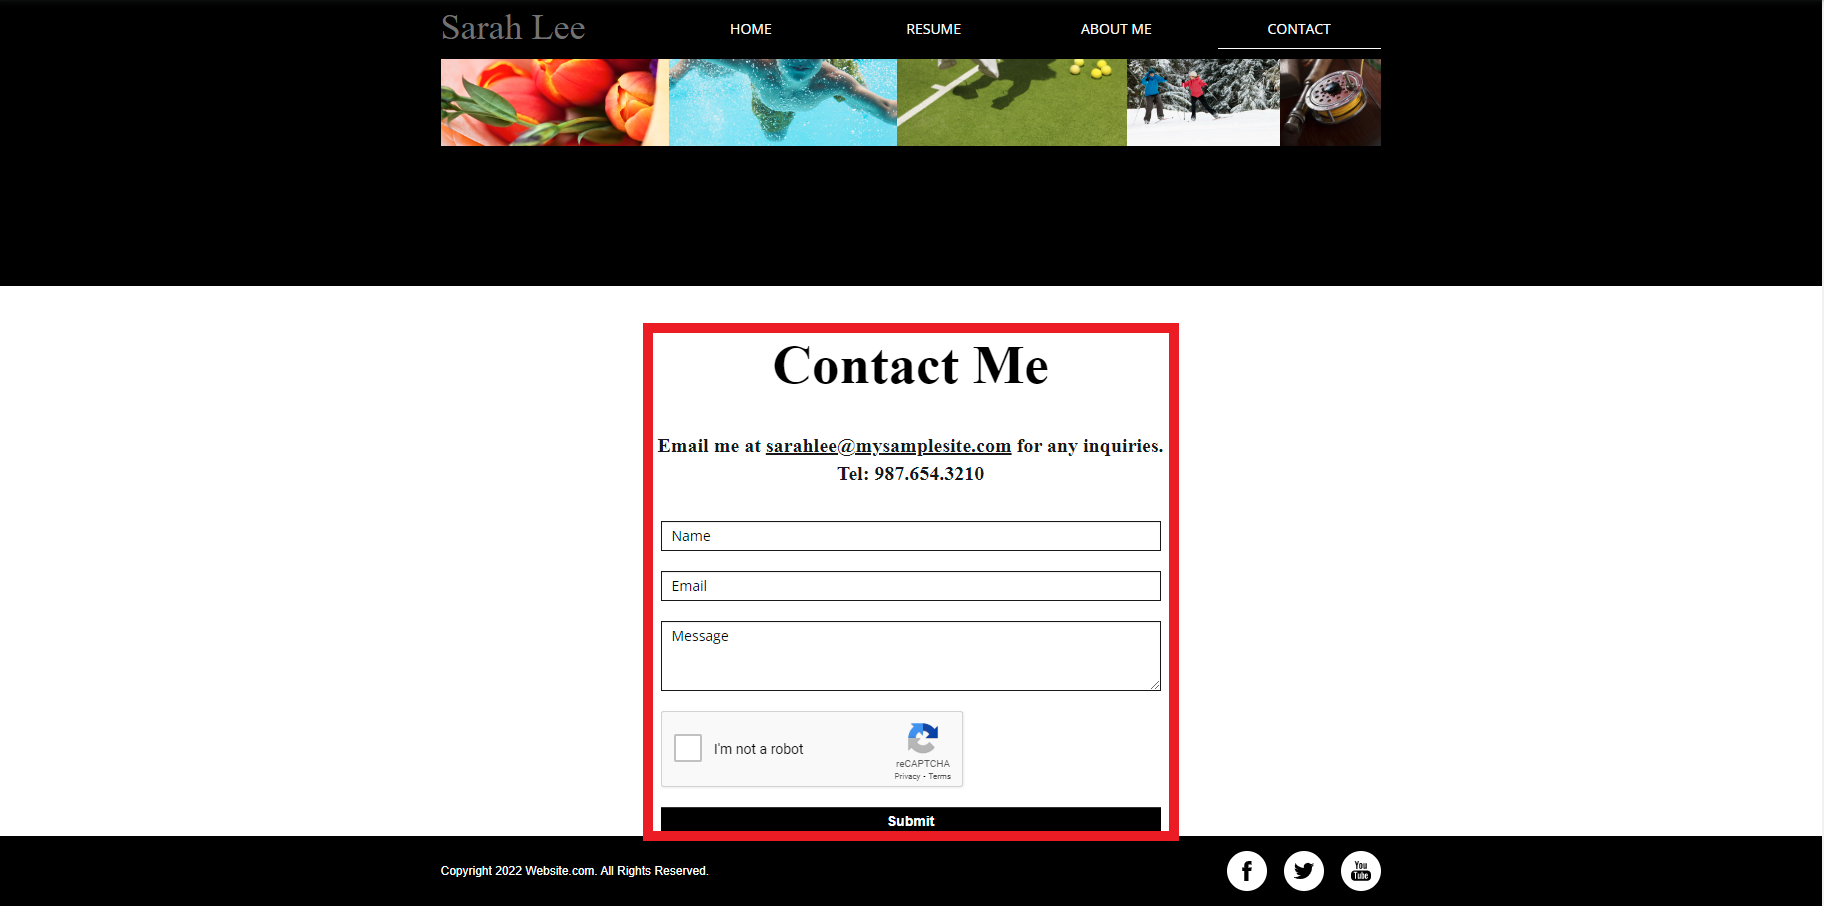
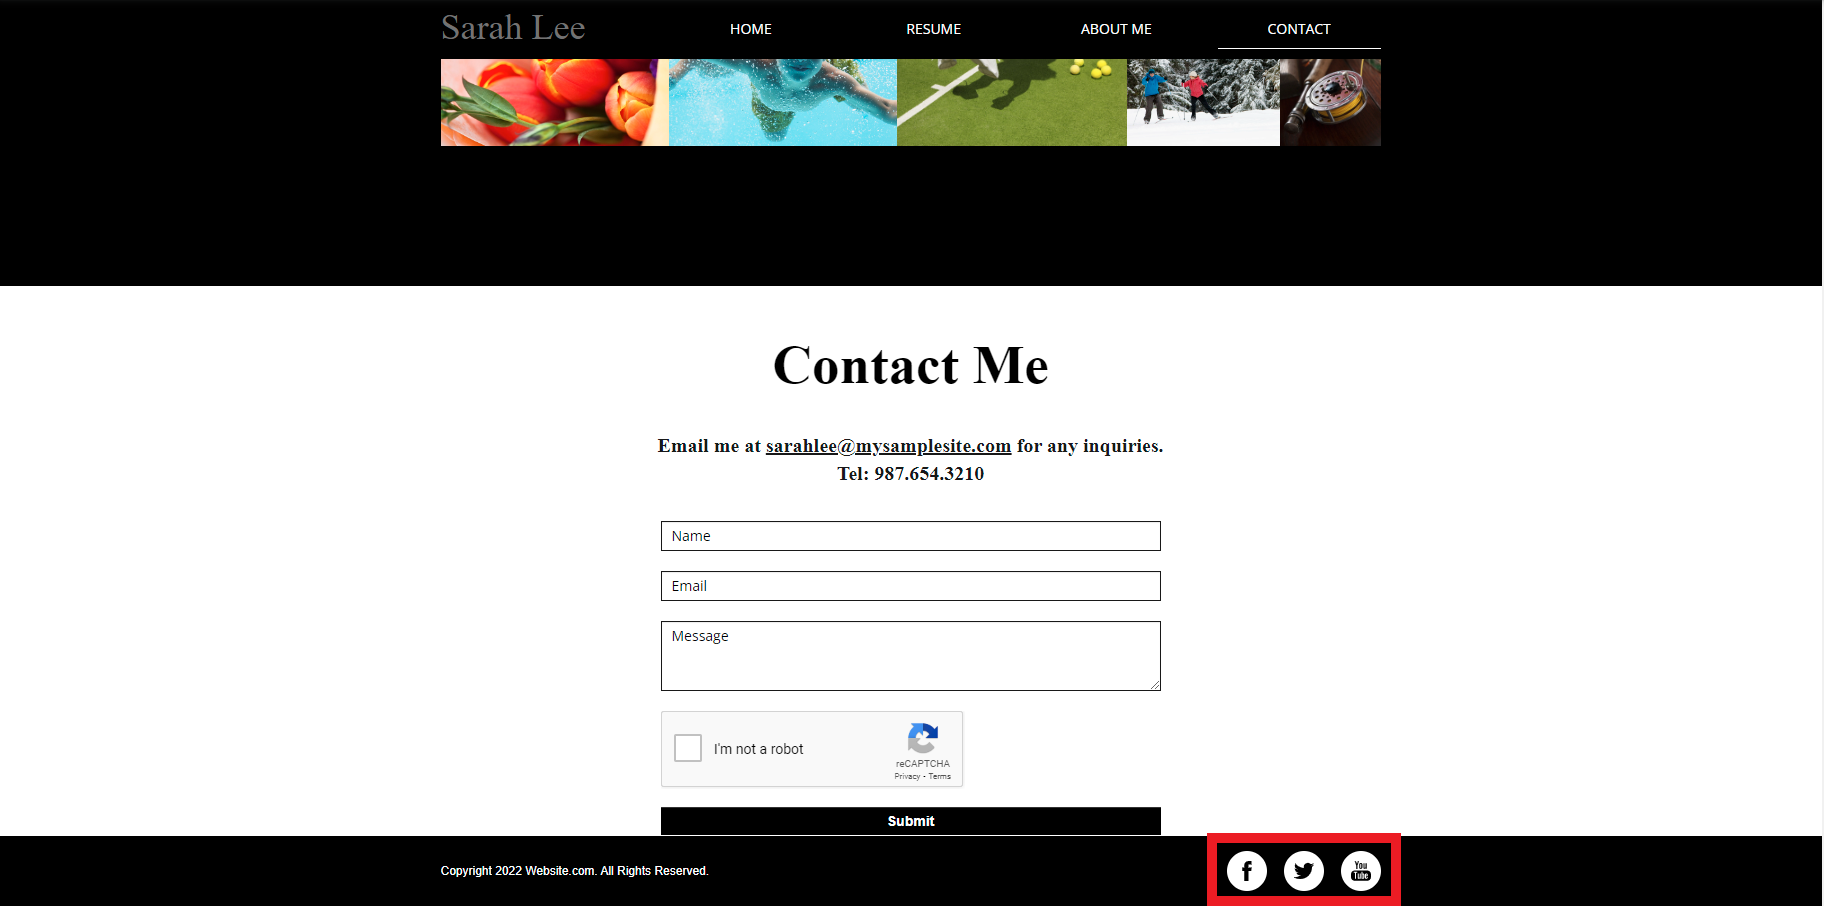
Now your new resume page is ready for you to customize and fill out with all your experience, education, and more. Returning to your website’s main page, let’s now make use of social links and a contact form. These should both come standard with the templates you’ve selected, so for the social links, just make sure they link to your desired social platforms.
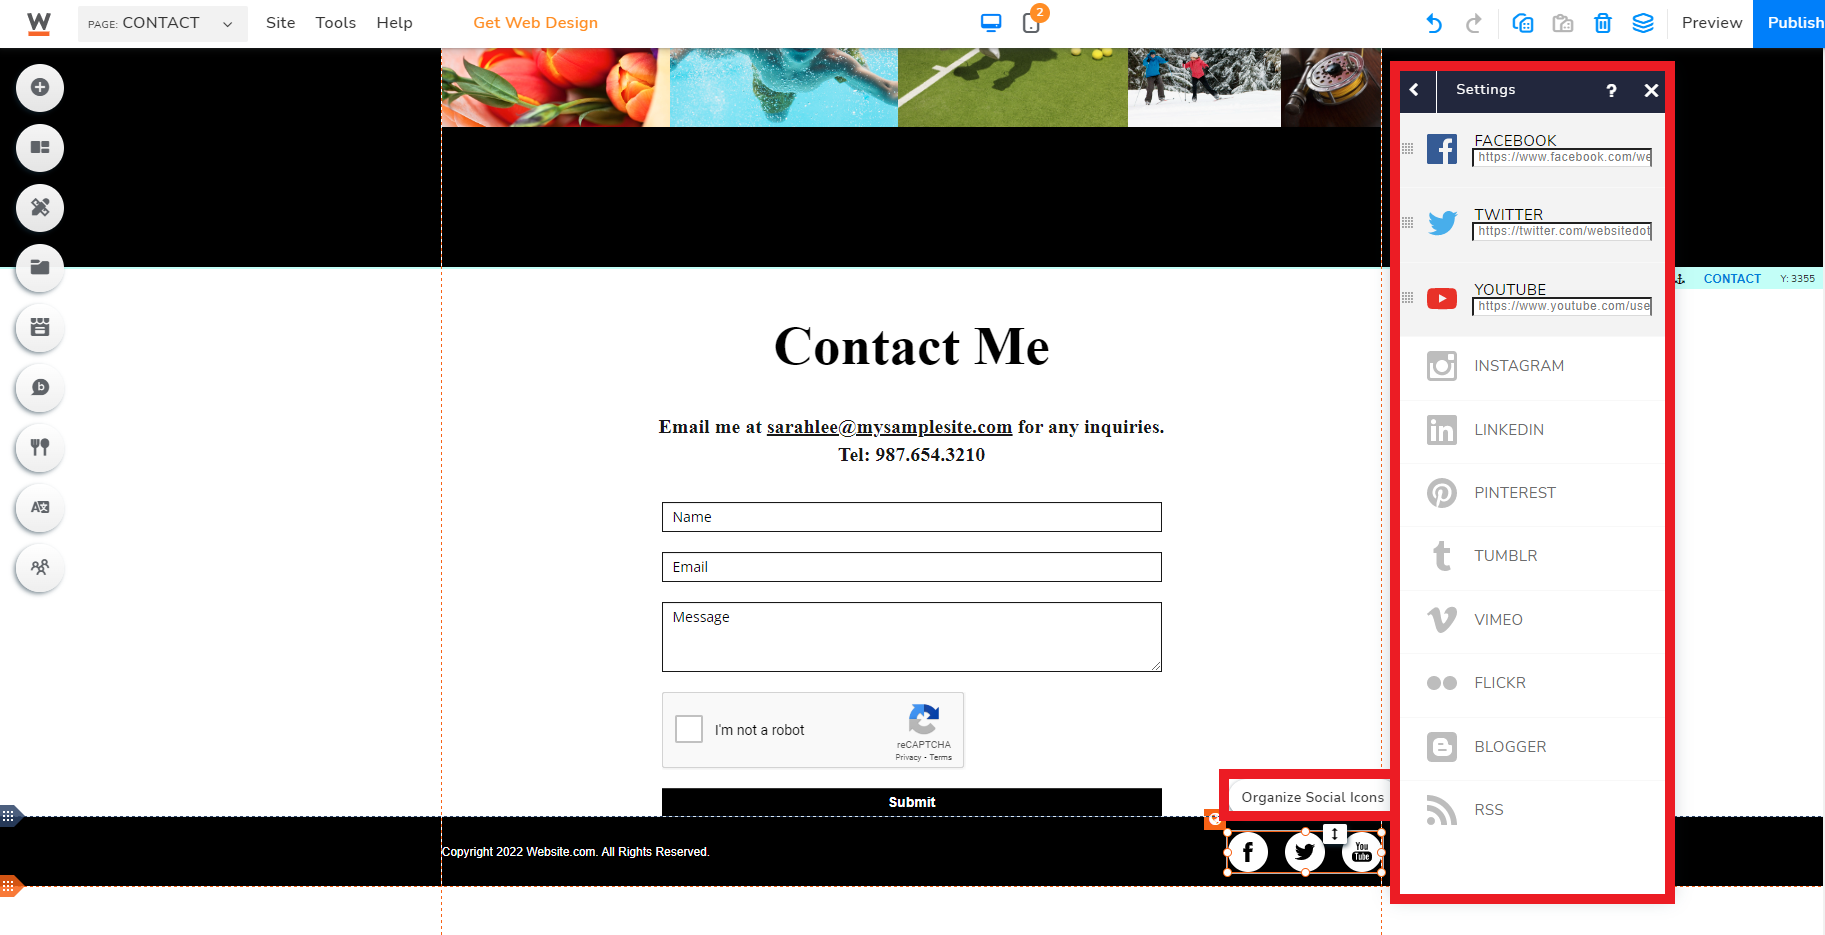
To edit your social links so that they link to your pages, simply click on the social links and then press the “Organize Social Icons” button, which makes a window pop up where you can edit what social icons are displayed and where you’d like them to link to.
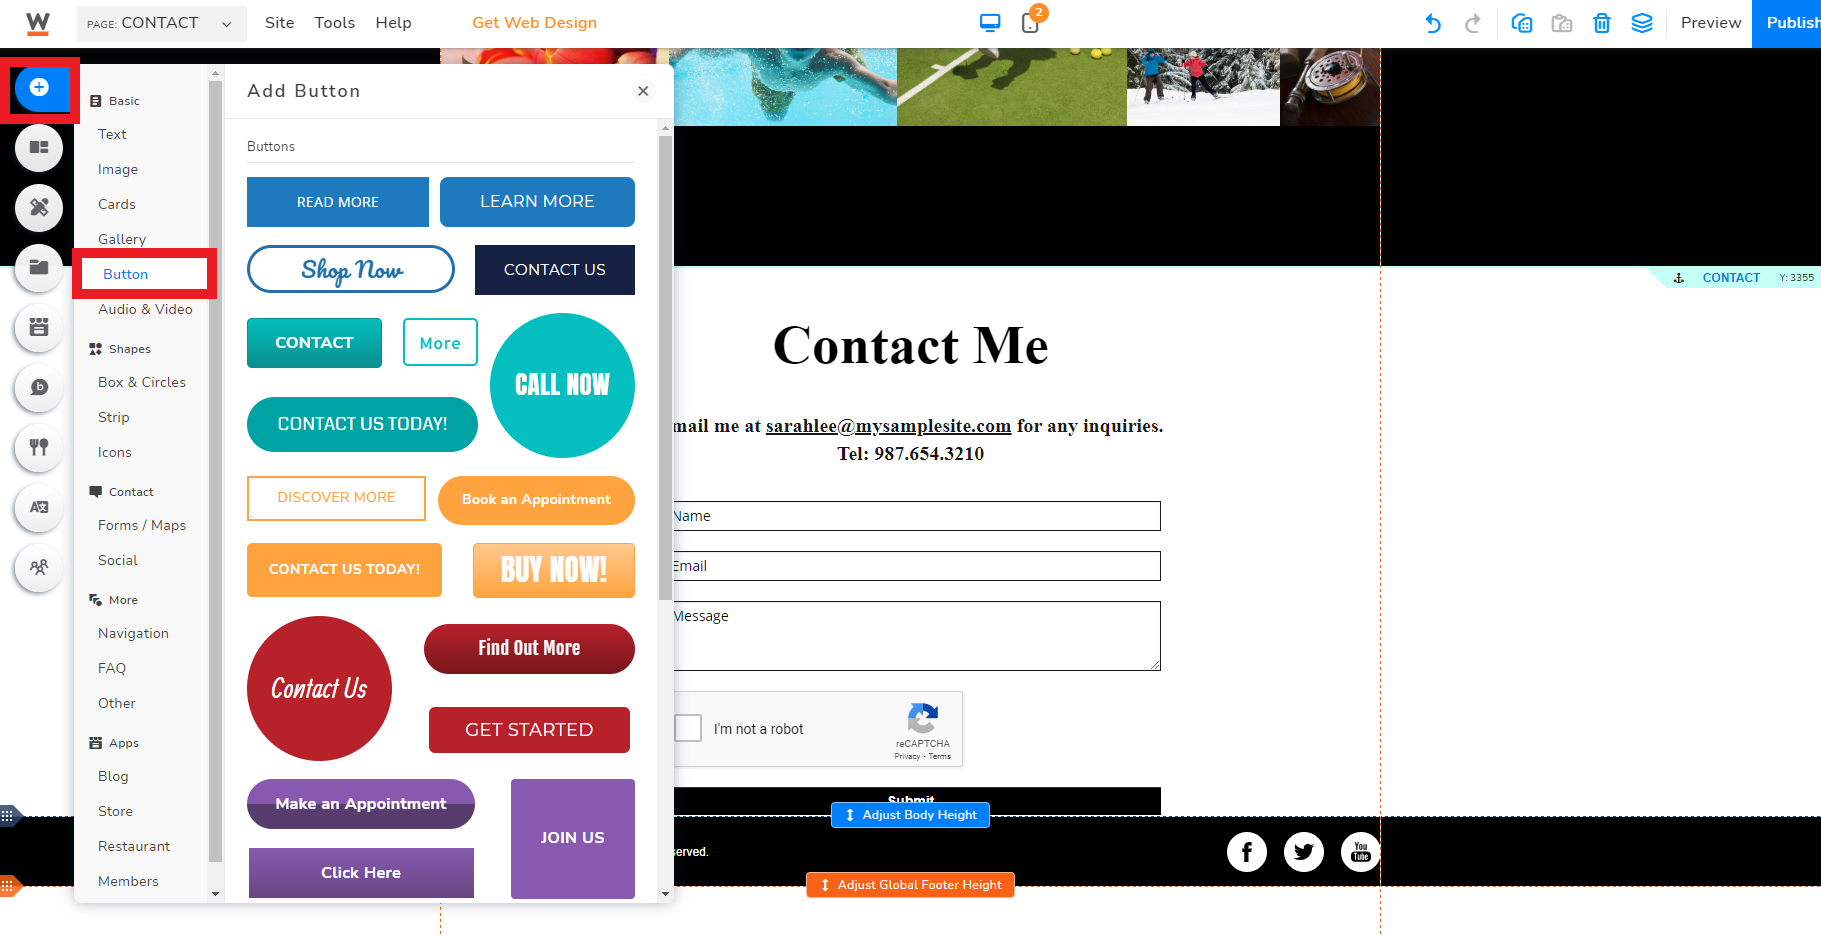
Following this, let’s add the ability for website visitors to download a PDF version of your resume via a button they press. Look at the column of circular buttons to the left of your screen and click into the “Add Elements” button. Now in the window that pops up, find the “Button” option in the column to the left of the new window and click it. From here, select a button you’d like to use, then place it somewhere on your site where you’d find it fitting; once the button appears somewhere on your site, simply drag the button around to move it. I’d recommend you have your button available in more than one place where it would be useful, such as one being where your Overview of yourself is, and another being where your complete resume page is.
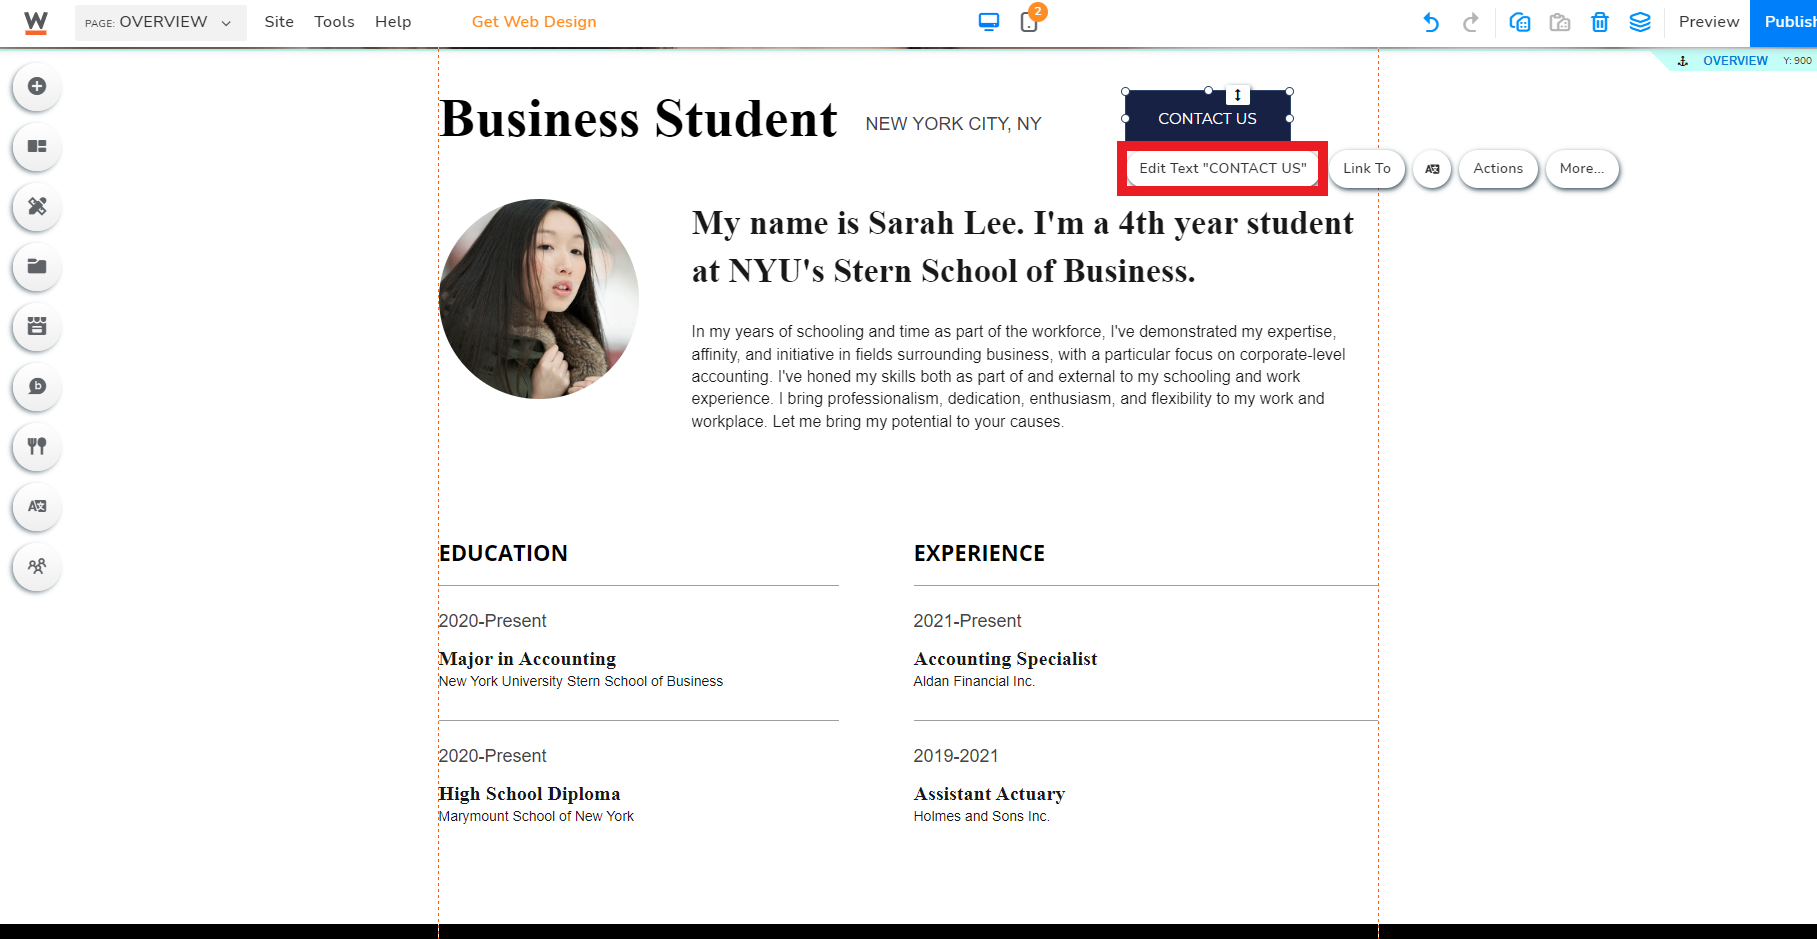
Simply click on the button style you want, and it appears on your site for you to drag to a location you’d like it to be. Then, to edit the text in the button, simply left click on the button once and click the “Edit Text “YOUR TEXT HERE”” button.
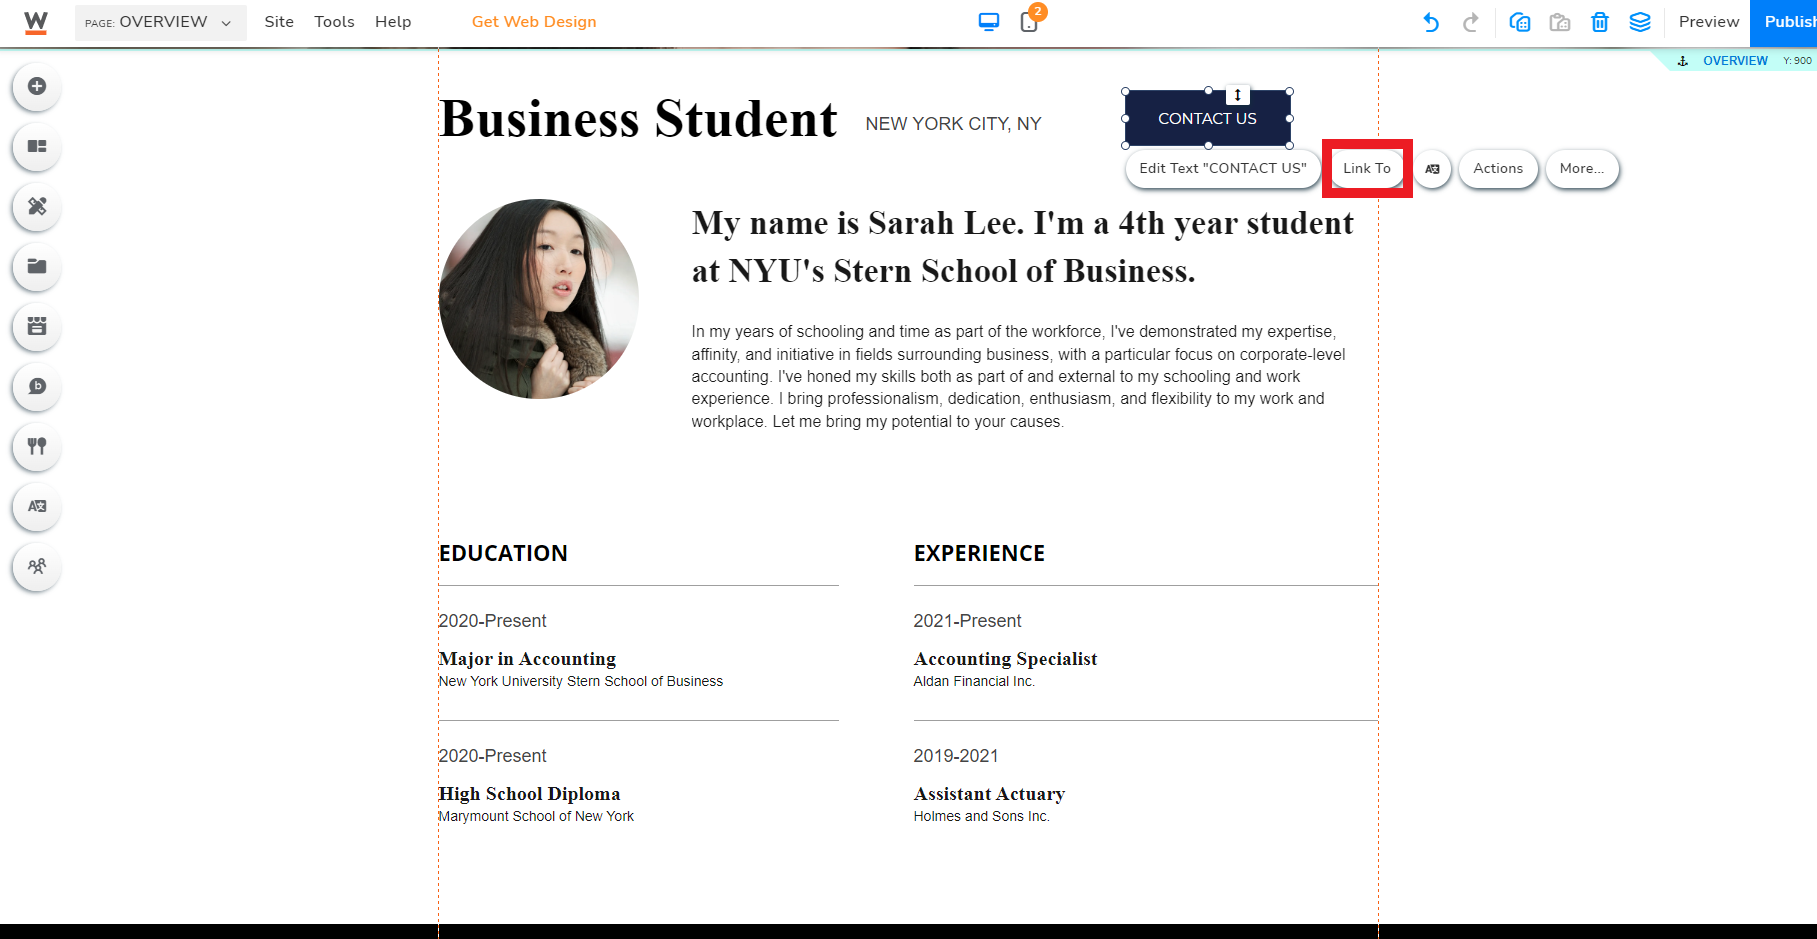
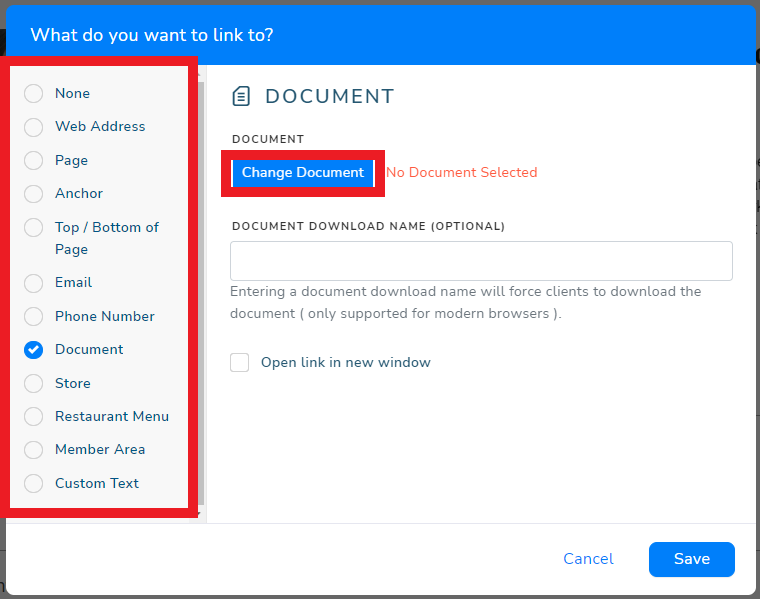
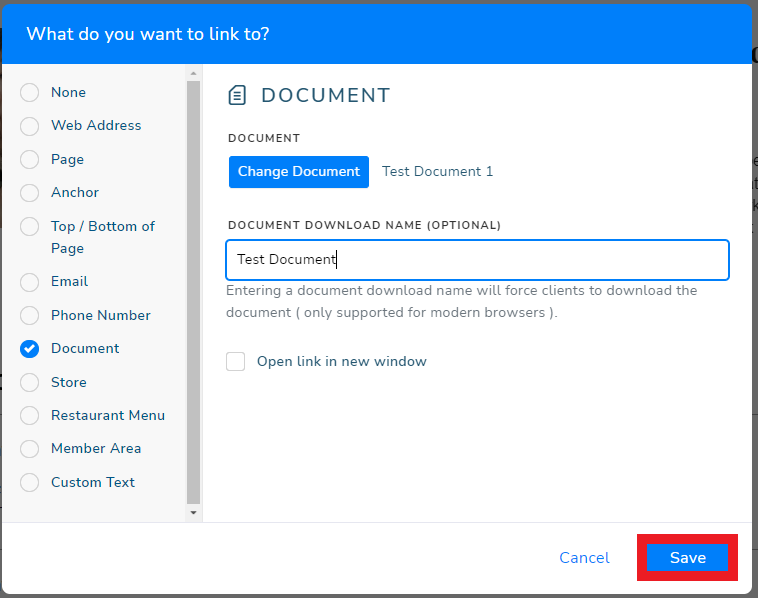
To make the button link to a piece of content, like a video or a PDF document, left click on the button and press the “Link To” button that appears, and look for the type of content you’d like the button to link to.
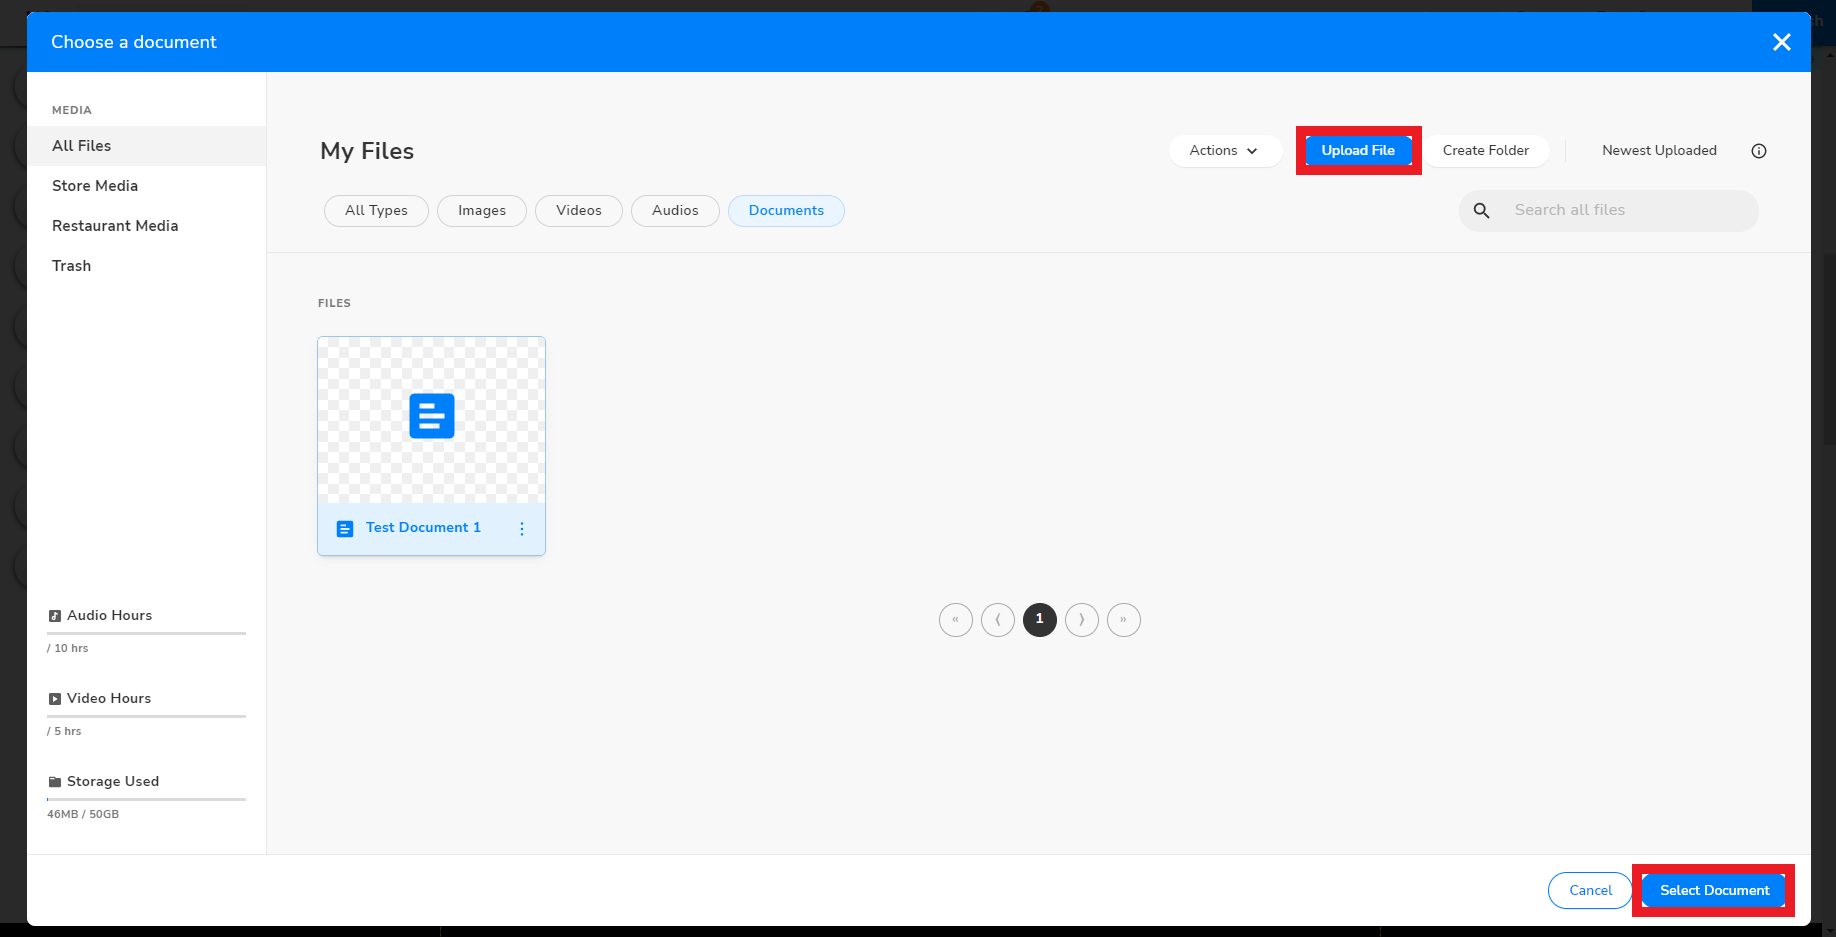
Choose it, then follow the prompts in the window to successfully link it to the button. In this example, I’ve linked the button to a document that I uploaded to my site using the blue “Upload File” button that appears when selecting a document, like so:
Now you’ve successfully added a button that links to content.
Once you’ve filled out all the information you need and have fleshed out your site with your content, congratulations, your site is ready to be published and start making strong first impressions!
Closing Thoughts
Creating a resume site can easily be more straightforward than you think. Following the steps shared in this article should be a solid guide for anyone to follow when building their resume site. Remember that after completing your resume site and beginning to use it, you should invest effort over time to keep it updated and professional, especially if such developments like you changing positions or completing new personal projects are relevant. A presentable and well-maintained resume site will go a long way in representing you and your abilities to your site visitors and potential employers!